Post Webhooks for Bitbucket
Overview
The Bitbucket Server and Data Center app allows users to send JSON payloads to external systems like Jenkins, customer scripts, and Serverless functions. It supports triggering Azure DevOps pipelines and sending Microsoft Teams notifications.
Other Bitbucket Data Center applications by Votazz
About Post Webhooks for Bitbucket
Check out the main features and capabilities of the Post Webhooks for Bitbucket app.
Main Functionality
Jenkins Post Webhooks for Bitbucket application for Bitbucket On-Premise (Server and Data Center) streamlines integration of Bitbucket and Jenkins, Azure DevOps, Microsoft Teams and many other tools:
allows to send JSON payloads to external systems like Jenkins, customer scripts, and serverless functions.
lets to configure the HTTP method to be used when sending webhook requests: POST (default), PUT and GET (not HTTP body sent), which ensures flexibility in how you receive and handle webhook payloads;
provides support for Azure DevOps Pipelines (Cloud and Server) that allows you to trigger Azure DevOps pipeline runs based on events occurring in your Bitbucket repositories;
users can configure global, project, and repository webhooks: the app supports multiple configurations per level for project and repository configurations or only one configuration on a global level; this parameter can be changed;
the app also supports Mutual TLS and allows users to filter events using various criteria, including event type, committers, repository and branch masks, and from/to branches.
sends Microsoft Teams real-time notifications to Microsoft Teams channels whenever certain events occur in Bitbucket repositories. With this integration, you can configure a webhook in Bitbucket to send a payload to a Microsoft Teams Webhook URL whenever a specific event, such as a code push or a pull request merge, takes place.
support of Basic, Bearer and Kerberos authentication to ensure secure communication when sending webhook requests.
you can use API to create rules. The API allows you to automate the creation and management of webhook rules, making it easier to configure and maintain your webhook integrations. The Bitbucket Branch Source Jenkins plugin uses the same APIs.
users can also include query string parameters in their requests;
the app has the option to skip SSL and URL validations and to skip notifications for personal projects and repositories.
Query string parameters support
Query string parameters support allows the passing of additional information or configuration settings to the webhook URL when a webhook event occurs.
The following query string parameters are supported:
Parameter | Definition |
|---|---|
| the repository slug. |
| the project key. |
| the branch name. |
| the from branch name of the pull request (relative git path) - f.e. refs/heads/bug/someBug |
| the from-branch name - f.e. |
| the to-branch name of the pull request (relative git path) - f.e. refs/heads/master |
| the to-branch name - f.e. |
| the pull request url |
Build status event handling
Bitbucket build status API provides the only commitId and Post Webhooks for Bitbucket needs to find rules to process an event. Because the App cannot get repository information, it uses two approaches to find the repository by commit id:
Default: the app caches the commit id and repository id to find the repository id by commit id in O(1) time.
Disabled by default since 3.12.23.
Repository search: the app scans all repositories and projects, globally where rules exist with
Enable repositories scan for build statusparameter switched on on Global settings tab. This approach is not very performant when a huge repository because it results in a repository scan.
Enabled by default before 3.12.23.
How to set up Azure DevOps Pipeline triggering from Bitbucket Server?
How to integrate Bitbucket Server with Jenkins Pipelines?
How to enable notifications from Bitbucket in Microsoft Teams?
How to choose an authentication type?
How to use Mutual TLS for Jenkins and Bitbucket integration?
Global configurations (Bitbucket administrators)
Get started guide for Bitbucket administrators.
Configuration
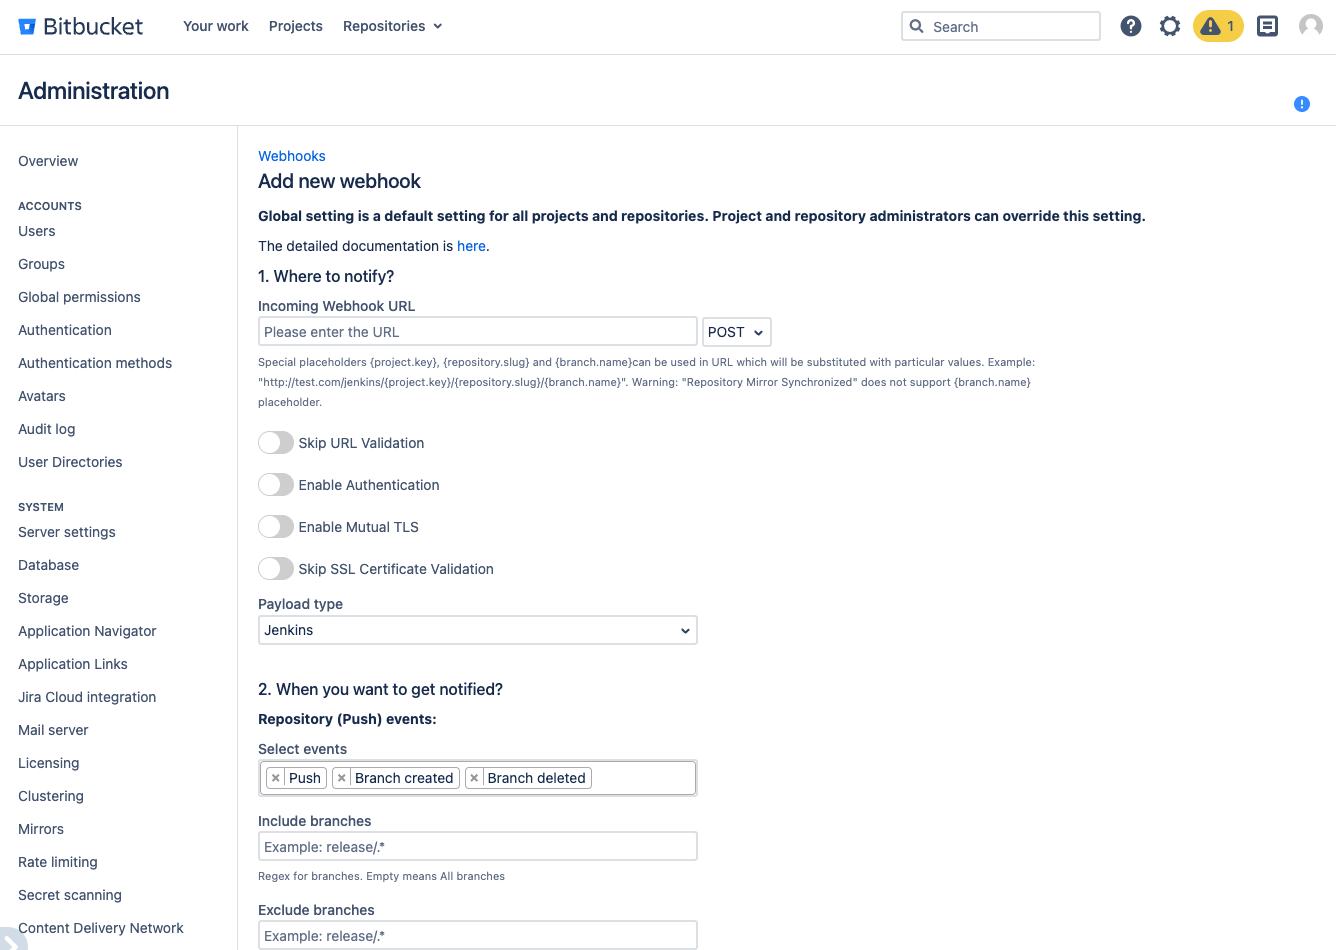
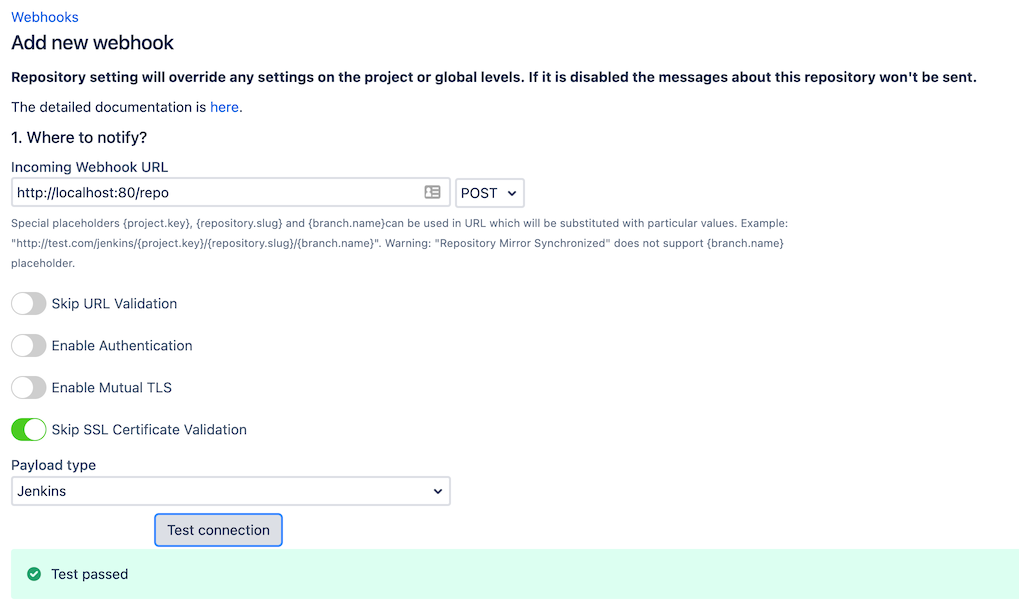
To start the Post Webhooks for Bitbucket plugin configuration you have to add a new webhook on the Global configuration page:
Move to the Bitbucket Administration section (“gear” button in the right corner of the navigation menu).
From the sidebar on the left, navigate to the Add-ons section and select our application Post Webhooks.
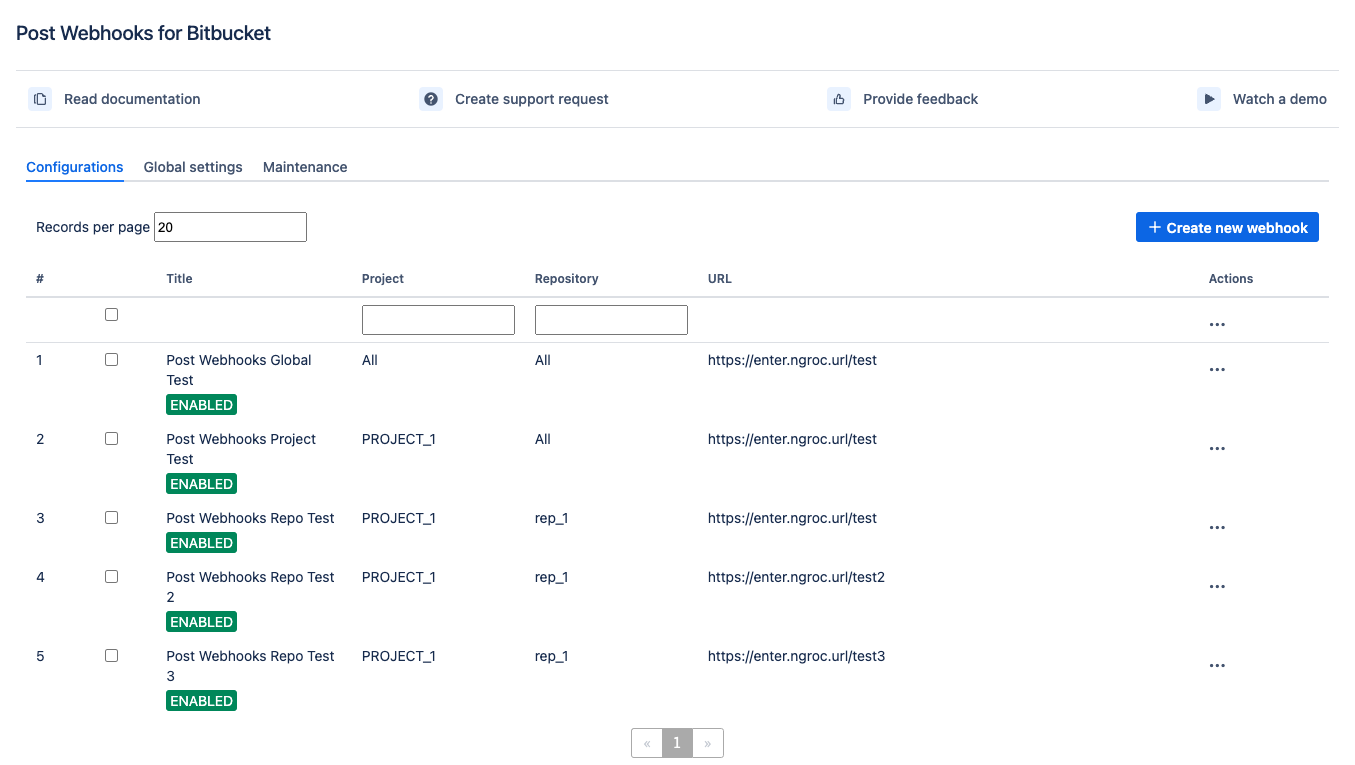
From the Configurations tab, click

After you have specified all the necessary parameters click on the Save button.
On the Configurations tab, you also can see all webhooks created on the repository and project levels. On Global level you can set up only 1 configuration .
Below you can find a short definition of each parameter you have to specify:
Parameter | Definition |
|---|---|
| resourse where the data should be sent. Also you have to specify the HTTP method to be used when making requests to the target URL:
|
| by enabling this parameter the app will allow you to use URLs that may not conform to the standard validation rules |
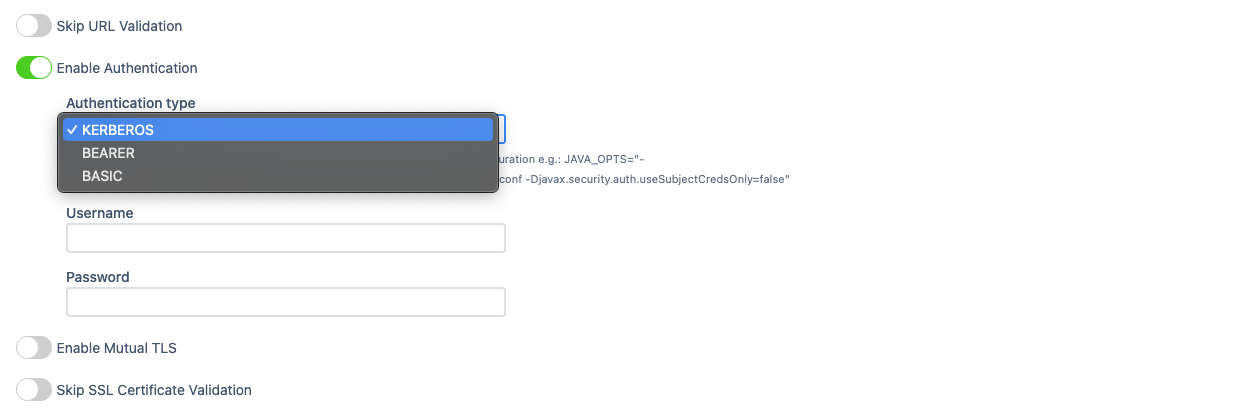
| the app adds an authentication mechanism to the webhook requests, ensuring that only authorized parties can access the webhook endpoint. By enabling this option you have to specify:
Kerberos authentication is available since 3.22.12
|
| enabling mutual TLS ensures that only trusted clients with valid and verified certificates can establish a connection with the webhook endpoint. By enabling this option you have to specify folowing parameters:
|
| this parameter instructs the app to skip the validation of SSL certificates, allowing the connection to be established even if the certificate cannot be verified. |
| allows you to specify which payload type should be sent. Supports:
The Azure DevOps pipeline that should be triggered when the webhook event occurs. By enabling this option additionality you have to specify folowing parameters:
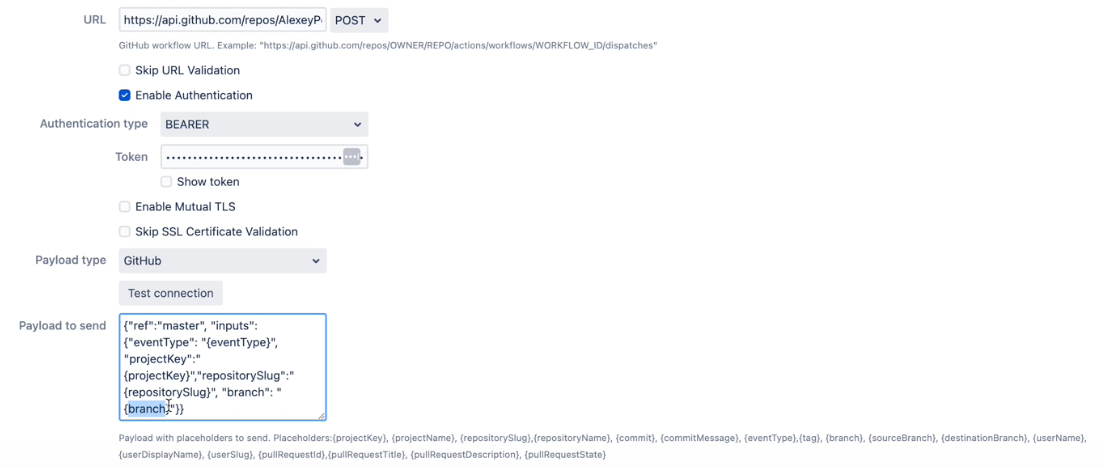
To trigger GitHub workflow use the following parameters,
CODE
 Find more details on GitHub workflow integrations with Bitbucket here |
| allows you to specify the type of events that should trigger the webhook |
| the comma-separated list of Bitbucket branch regular expressions that should be considered when filtering events. For instance, |
| the comma-separated list of Bitbucket branch regexes that should be ignored. |
| allows you to specify the type of events that should trigger the webhook |
| the comma-separated list of Bitbucket branch regexes that should be included |
| the comma-separated list of Bitbucket branch regexes that should be ignored. |
| the comma-separated list of Bitbucket user names that should NOT trigger an event. This is often used to ignore pushes from your continuous integration user. Important: not display names, but usernames. For instance, |
| comma-separated list of file paths, only commits on these file paths will trigger the webhook. For example, |
| a pattern or regular expression that defines the repositories for which the webhook should be triggered. Commits on these repositories will trigger this hook. For instance, |
| skip triggering events for commits/pull requests that include the |
| skip the events that occur in forked repositories. |
| comma-separated list of Bitbucket project keys that will trigger this event. |
| comma-separated list of Bitbucket project keys that will be IGNORED for this event. This could be used with the combination of Include projects empty (include all). |
| the name of the configuration Our advice is to name something meaningful to you and your team so that it can be understood later easier. |
| Disable to prevent this ruleset being active |
Once the webhook has been created, you can start using app. The rest configurations are optional to make your integrations more streamlined and efficient.
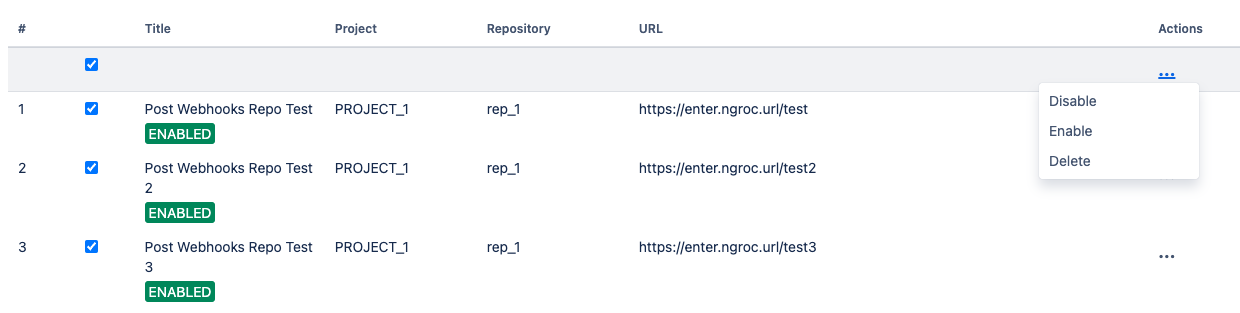
A table of created webhooks provides a centralized view of all webhooks configured across your Bitbucket instance. It allows you to see the complete list of webhooks in one place, making it easier to manage and monitor them.
You can quickly filter the webhooks list you need to manage with the help of configuration filtering fields. Filtering is possible by project name and repository name.

For the selected webhooks list you are able to apply the following actions:
Disable
Enable
Delete
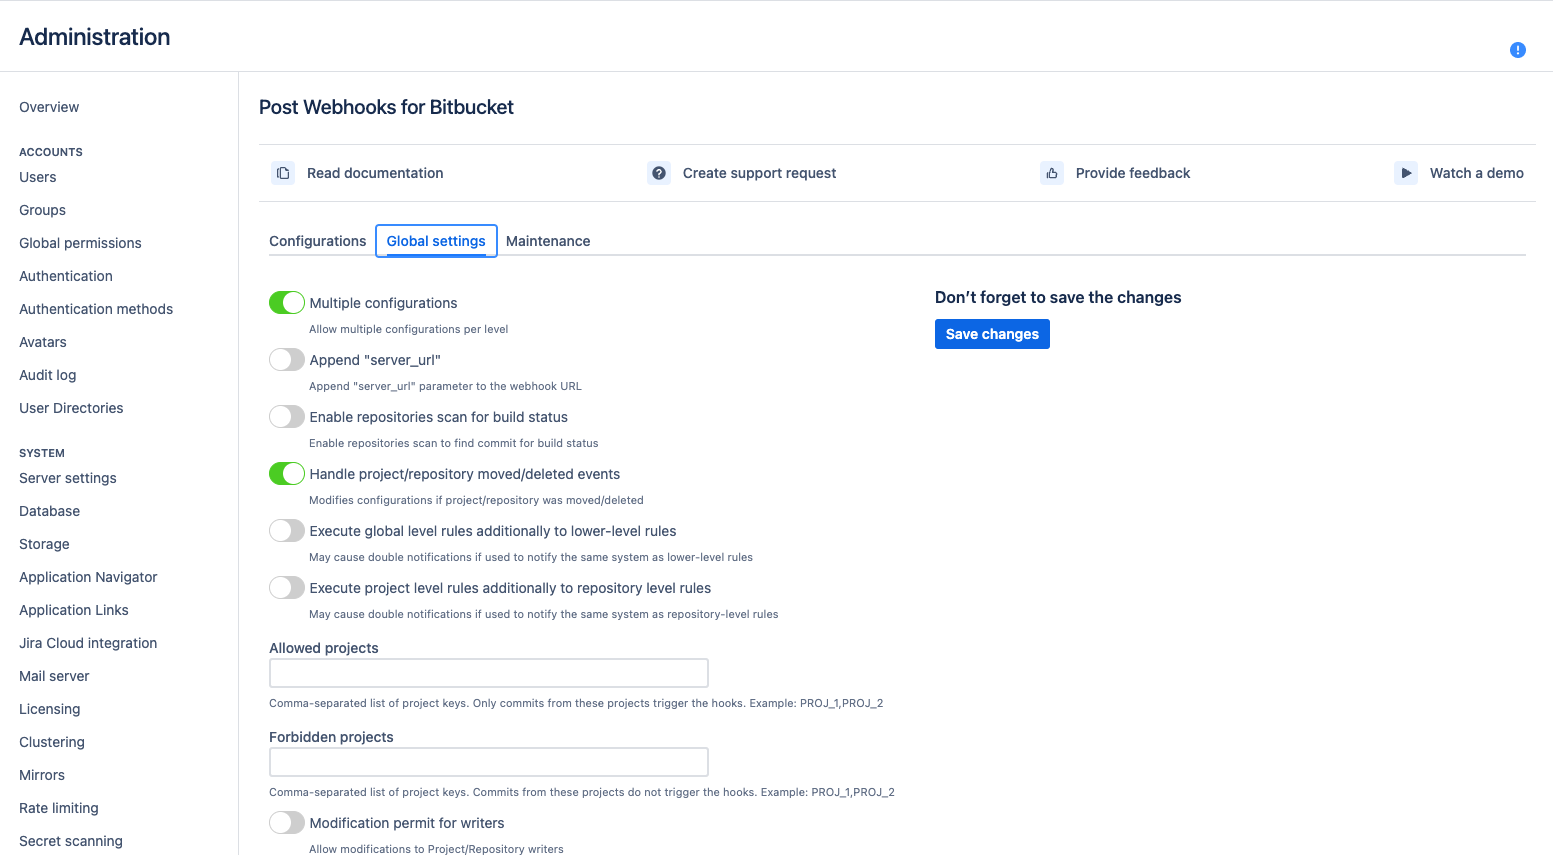
Global settings
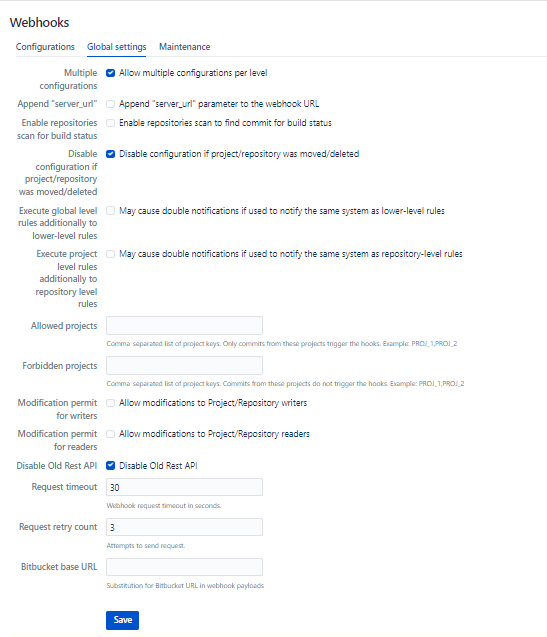
The Global Settings tab allows Bitbucket administrators to configure and customize the integration settings.
Here you can specify the list of parameters applied to the rest configuration levels located in Project Settings and Repository settings.
Below you can find a short definition of each parameter:
Parameter | Definition |
|---|---|
| enables allowing multiple configurations per level This setting permits to have multiple configurations on the project and repository levels. Global configuration can be only 1. |
| determines whether the server URL should be appended to the target URL when sending webhook requests. It can be useful when the target system requires the server URL as part of the request. |
| enables the app to scan repositories for build status information. |
|
Available since 3.12 controls whether the app should disable a configuration if the associated project or repository in Bitbucket is moved or deleted. Not valid configurations are marked in yellow and shown only at the global level so that the global admin can amend or delete them. In the older versions, you may see |
| allows global-level rules to be executed independently (or on top) of the lower-level rules (e.g., repository or project level rules). If this setting is disabled the rules are combined into 1 rule for a particular event. But if this setting is enabled, it may cause double notifications if the rules on different levels are configured to override some settings and notify the same 3rd party system. |
| determines whether project level rules should be executed independently of repository level rules. These two parameters Repo or project admins set up their own configurations. Alternatively, by default, the rules are merged for each repository. |
| a list of allowed projects, only repositories within these projects will be considered for webhook execution. |
| a list of forbidden projects, repositories within these projects will be excluded from webhook execution. |
| repository writers to use REST APIs to manage configurations. |
| repository writers are allowed to use REST APIs to manage configurations. |
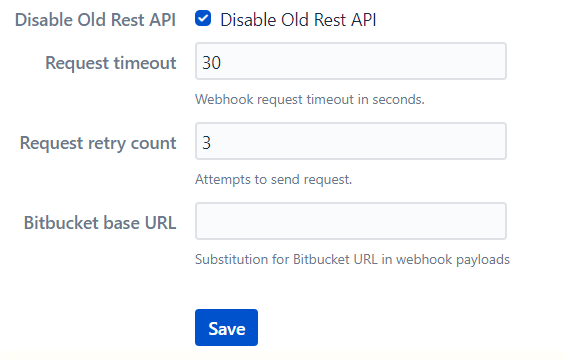
| disables the use of the old REST API for webhook execution. |
| the timeout duration for webhook requests; if the target URL doesn't respond within the specified time, the request will be considered as timed out. The default value is 30 sec. |
| the number of times the app should retry failed webhook requests before giving up |
| the base URL of your Bitbucket server or cloud instance |
Query string parameters support
How to use query string parameters
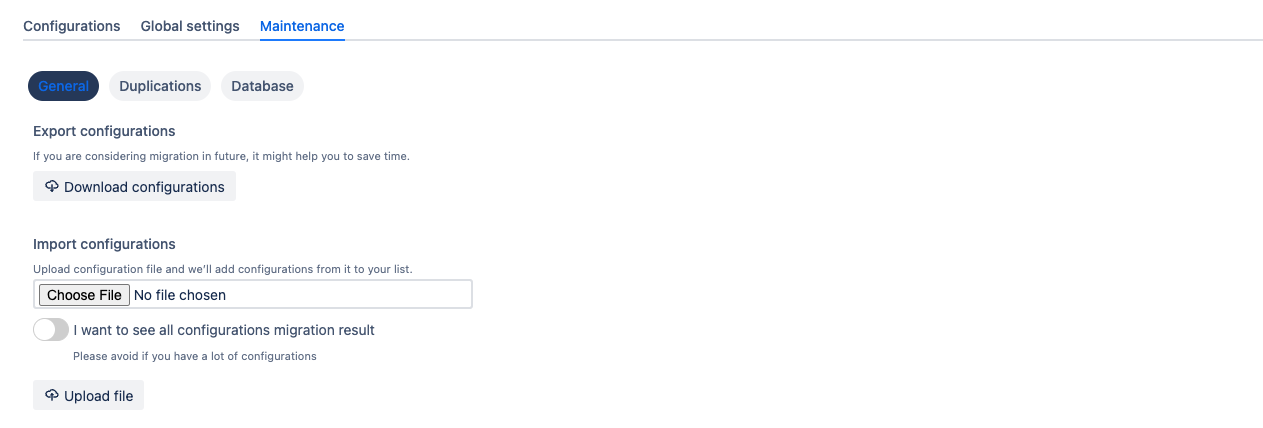
Maintenance
The Maintenance tab in the global configurations serves for managing and maintaining the webhook configurations ensuring their reliability.
Below you can find a short definition of each parameter:
Parameter | Definition |
|---|---|
| export the current webhook configurations to a file. It is useful for creating backups or for migrating configurations to another instance of the app or Bitbucket server. |
| import webhook configurations from a previously exported file. It enables easy restoration of configurations or migration to a new instance of the app or Bitbucket server. |
| this parameter displays the result of the migration process when importing configurations. It helps you identify any issues or errors encountered during the migration and allows for troubleshooting if needed. |
Duplications
This section allows you to located and identify duplicated configurations. You can filter by Project & Repository

Rerun data migration
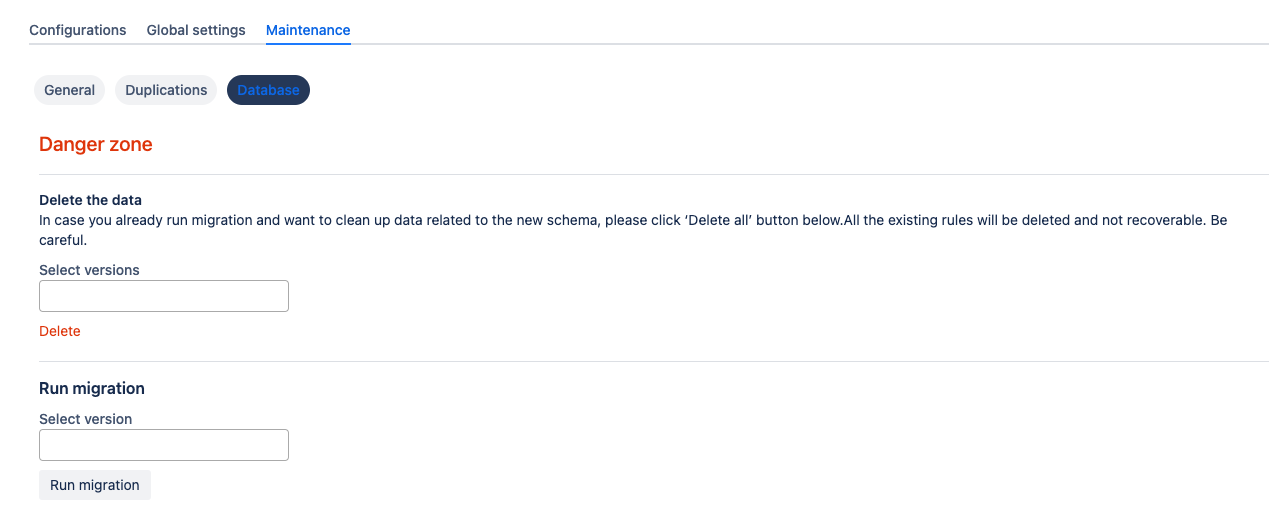
There is a Danger zone in the Maintenance tab, under the Database option, where you can delete all existing configurations and rerun migration from older (free) versions.
We recommend backup all data first.
Debugging and troubleshooting
Please follow these how-to articles:
How to set up Azure DevOps Pipeline triggering from Bitbucket Server?
How to integrate Bitbucket Server with Jenkins Pipelines?
How to enable notifications from Bitbucket in Microsoft Teams?
How to choose an authentication type?
How to use Mutual TLS for Jenkins and Bitbucket integration?
Project level configurations
Get started guide for Bitbucket project administrators.
Project-level configurations of the Post Webhooks for Bitbucket app allow you to set up webhooks specific to a particular project in Bitbucket. Project-level configurations enable seamless integration with project-specific tools, services, or workflows. You can customize event triggers, target URLs, and other settings based on project requirements.
Configuration
To start the Post Webhooks for Bitbucket plugin configuration on the project level you have to add a new webhook in the Project Settings:
Move to the Bitbucket project where you wish to set up Post Webhooks for Bitbucket app.
Navigate to the Project Settings by clicking on the “gear” button on the left sidebar.
On the Workflow section find our application Post Webhooks.
From the Configurations tab, click

After you have specified all the necessary parameters click on the Save button.
To enable the creation of multiple rules on the project level contact your Bitbucket administrator.

Below you can find a short definition of each parameter:
Parameter | Definition |
|---|---|
| resourse where the data should be sent. Also you have to specify the HTTP method to be used when making requests to the target URL:
|
| by enabling this parameter the app will allow you to use URLs that may not conform to the standard validation rules |
| the app adds an authentication mechanism to the webhook requests, ensuring that only authorized parties can access the webhook endpoint. By enabling this option you have to specify:
Kerberos authentication is available since 3.22.12
|
| enabling mutual TLS ensures that only trusted clients with valid and verified certificates can establish a connection with the webhook endpoint. By enabling this option you have to specify folowing parameters:
|
| this parameter instructs the app to skip the validation of SSL certificates, allowing the connection to be established even if the certificate cannot be verified. |
| allows you to specify which payload type should be sent. Supports:
The Azure DevOps pipeline that should be triggered when the webhook event occurs. By enabling this option additionality you have to specify folowing parameters:
To trigger GitHub workflow use the following parameters,
CODE
 Find more details on GitHub workflow integrations with Bitbucket here |
| allows you to specify the type of events that should trigger the webhook |
| the comma-separated list of Bitbucket branch regular expressions that should be considered when filtering events. For instance, |
| the comma-separated list of Bitbucket branch regexes that should be ignored. |
| allows you to specify the type of events that should trigger the webhook |
| the comma-separated list of Bitbucket branch regexes that should be included |
| the comma-separated list of Bitbucket branch regexes that should be ignored. |
| the comma-separated list of Bitbucket user names that should NOT trigger an event. This is often used to ignore pushes from your continuous integration user. Important: not display names, but usernames. For instance, |
| comma-separated list of file paths, only commits on these file paths will trigger the webhook. For example, |
| a pattern or regular expression that defines the repositories for which the webhook should be triggered. Commits on these repositories will trigger this hook. For instance, |
| skip triggering events for commits/pull requests that include the |
| skip the events that occur in forked repositories. |
| comma-separated list of Bitbucket project keys that will trigger this event. |
| comma-separated list of Bitbucket project keys that will be IGNORED for this event. This could be used with the combination of Include projects empty (include all). |
| the name of the configuration Our advice is to name something meaningful to you and your team so that it can be understood later easier. |
| Disable to prevent this ruleset being active |
A table of created webhooks provides a centralized view of all webhooks configured across your Bitbucket project. It makes it easier to manage and monitor them.
You can quickly filter the webhook list you need with the help of the configuration filtering field. Filtering is possible by repository name.

For the selected webhooks list you are able to apply the following actions:
Disable
Enable
Delete
Query string parameters support
How to use query string parameters
How to set up Azure DevOps Pipeline triggering from Bitbucket Server?
How to integrate Bitbucket Server with Jenkins Pipelines?
How to enable notifications from Bitbucket in Microsoft Teams?
Repository level configurations
Get started guide for Post Webhooks for Bitbucket app on the repository level.
Different repositories may have unique integration requirements with external services or applications. With repository-level configurations, you can set up specific webhooks for each repository, enabling seamless integration with repository-specific tools, services, or workflows. Different teams or individuals working on a repository can set up their webhooks to suit their needs.
Configuration
To start the Post Webhooks for Bitbucket plugin configuration on the repository level you have to add a new webhook in the Repository Settings section:
Move to the Bitbucket repository where you wish to set up Post Webhooks for Bitbucket app.
Navigate to the Repository settings by clicking on the “gear” button on the left sidebar.
On the Workflow section find our application Post Webhooks.
From the Configurations tab, click

After you have specified all the necessary parameters click on the Save button.
To enable the creation of multiple rules on the repository level contact your Bitbucket administrator.

Below you can find a short definition of each parameter:
Parameter | Definition |
|---|---|
| resourse where the data should be sent. Also you have to specify the HTTP method to be used when making requests to the target URL:
|
| by enabling this parameter the app will allow you to use URLs that may not conform to the standard validation rules |
| the app adds an authentication mechanism to the webhook requests, ensuring that only authorized parties can access the webhook endpoint. By enabling this option you have to specify:
Kerberos authentication is available since 3.22.12
|
| enabling mutual TLS ensures that only trusted clients with valid and verified certificates can establish a connection with the webhook endpoint. By enabling this option you have to specify folowing parameters:
|
| this parameter instructs the app to skip the validation of SSL certificates, allowing the connection to be established even if the certificate cannot be verified. |
| allows you to specify which payload type should be sent. Supports:
The Azure DevOps pipeline that should be triggered when the webhook event occurs. By enabling this option additionality you have to specify folowing parameters:
To trigger GitHub workflow use the following parameters,
CODE
 Find more details on GitHub workflow integrations with Bitbucket here |
| allows you to specify the type of events that should trigger the webhook |
| the comma-separated list of Bitbucket branch regular expressions that should be considered when filtering events. For instance, |
| the comma-separated list of Bitbucket branch regexes that should be ignored. |
| allows you to specify the type of events that should trigger the webhook |
| the comma-separated list of Bitbucket branch regexes that should be included |
| the comma-separated list of Bitbucket branch regexes that should be ignored. |
| the comma-separated list of Bitbucket user names that should NOT trigger an event. This is often used to ignore pushes from your continuous integration user. Important: not display names, but usernames. For instance, |
| comma-separated list of file paths, only commits on these file paths will trigger the webhook. For example, |
| a pattern or regular expression that defines the repositories for which the webhook should be triggered. Commits on these repositories will trigger this hook. For instance, |
| skip triggering events for commits/pull requests that include the |
| skip the events that occur in forked repositories. |
| comma-separated list of Bitbucket project keys that will trigger this event. |
| comma-separated list of Bitbucket project keys that will be IGNORED for this event. This could be used with the combination of Include projects empty (include all). |
| the name of the configuration Our advice is to name something meaningful to you and your team so that it can be understood later easier. |
| Disable to prevent this ruleset being active |
A table of created webhooks provides a centralized view of all webhooks configured across your Bitbucket repository. It makes it easier to manage and monitor them.
For the selected webhooks list you are able to apply the following actions:
Disable
Enable
Delete
Query string parameters support
How to use query string parameters
How to set up Azure DevOps Pipeline triggering from Bitbucket Server?
How to integrate Bitbucket Server with Jenkins Pipelines?
How to enable notifications from Bitbucket in Microsoft Teams?
How to create a new webhook
This guide is for Post Webhooks for the Bitbucket Atlassian Marketplace application.
To start the Post Webhooks for Bitbucket plugin and enable seamless integration between Bitbucket and other systems or services you have to add a new webhook.
Сreating a new webhook is available on all configuration levels:
Global Configurations for Bitbucket admins
Repository Level Configurations
Find our application Post Webhooks on the level that suits your needs best: Global, Project, or Repository.
From the Configurations tab, click

After you have specified all the necessary parameters click on the Save button.
On the Configurations tab of Global Configurations, you can see all webhooks created on the repository and project levels. On Global level you can set up only 1 webhook.
Below you can find a short definition of each parameter you have to specify:
Parameter | Definition |
|---|---|
| resourse where the data should be sent. Also you have to specify the HTTP method to be used when making requests to the target URL:
|
| by enabling this parameter the app will allow you to use URLs that may not conform to the standard validation rules |
| the app adds an authentication mechanism to the webhook requests, ensuring that only authorized parties can access the webhook endpoint. By enabling this option you have to specify:
Kerberos authentication is available since 3.22.12
|
| enabling mutual TLS ensures that only trusted clients with valid and verified certificates can establish a connection with the webhook endpoint. By enabling this option you have to specify folowing parameters:
|
| this parameter instructs the app to skip the validation of SSL certificates, allowing the connection to be established even if the certificate cannot be verified. |
| allows you to specify which payload type should be sent. Supports:
The Azure DevOps pipeline that should be triggered when the webhook event occurs. By enabling this option additionality you have to specify folowing parameters:
To trigger GitHub workflow use the following parameters,
CODE
 Find more details on GitHub workflow integrations with Bitbucket here |
| allows you to specify the type of events that should trigger the webhook |
| the comma-separated list of Bitbucket branch regular expressions that should be considered when filtering events. For instance, |
| the comma-separated list of Bitbucket branch regexes that should be ignored. |
| allows you to specify the type of events that should trigger the webhook |
| the comma-separated list of Bitbucket branch regexes that should be included |
| the comma-separated list of Bitbucket branch regexes that should be ignored. |
| the comma-separated list of Bitbucket user names that should NOT trigger an event. This is often used to ignore pushes from your continuous integration user. Important: not display names, but usernames. For instance, |
| comma-separated list of file paths, only commits on these file paths will trigger the webhook. For example, |
| a pattern or regular expression that defines the repositories for which the webhook should be triggered. Commits on these repositories will trigger this hook. For instance, |
| skip triggering events for commits/pull requests that include the |
| skip the events that occur in forked repositories. |
| comma-separated list of Bitbucket project keys that will trigger this event. |
| comma-separated list of Bitbucket project keys that will be IGNORED for this event. This could be used with the combination of Include projects empty (include all). |
| the name of the configuration Our advice is to name something meaningful to you and your team so that it can be understood later easier. |
| Disable to prevent this ruleset being active |
A table of created webhooks provides a centralized view of all webhooks configured across your Bitbucket instance. It allows you to see the complete list of webhooks in one place, making it easier to manage and monitor them.
How to set up Azure DevOps Pipeline triggering from Bitbucket Server?
How to enable notifications from Bitbucket in Microsoft Teams?
How to set up Azure DevOps Pipeline triggering from Bitbucket Server
By integrating Post Webhooks for Bitbucket with Azure DevOps Pipelines, you can achieve tighter integration between your Bitbucket repositories and your CI/CD workflows, enabling seamless automation and ensuring that your code is always up to date and properly deployed.
This guide is for Post Webhooks for the Bitbucket Atlassian Marketplace application.
Getting the personal access token
To move forward with the configuration of Azure DevOps Pipeline triggering, we recommend you first obtain a Personal Access Token (PAT) to connect your Confluence and Azure DevOps instances. You can use a service account to generate this PAT but do remember that Microsoft forces you to log in every 90 days to keep the PATs active.
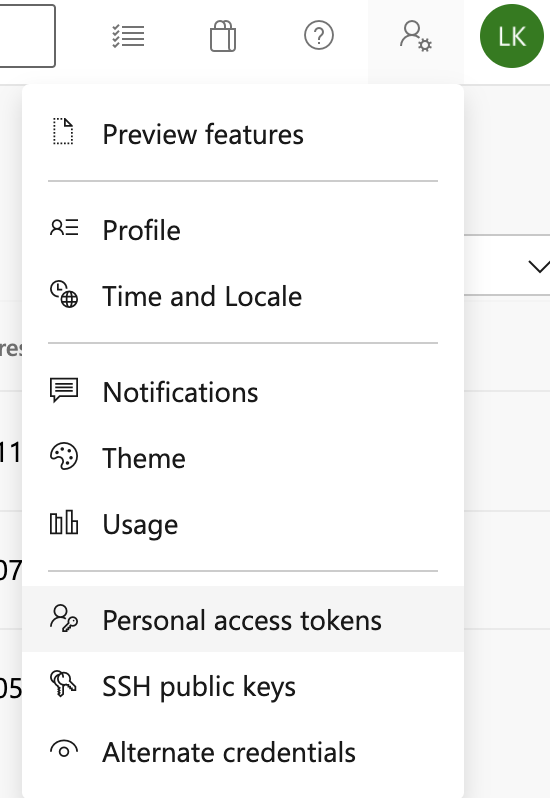
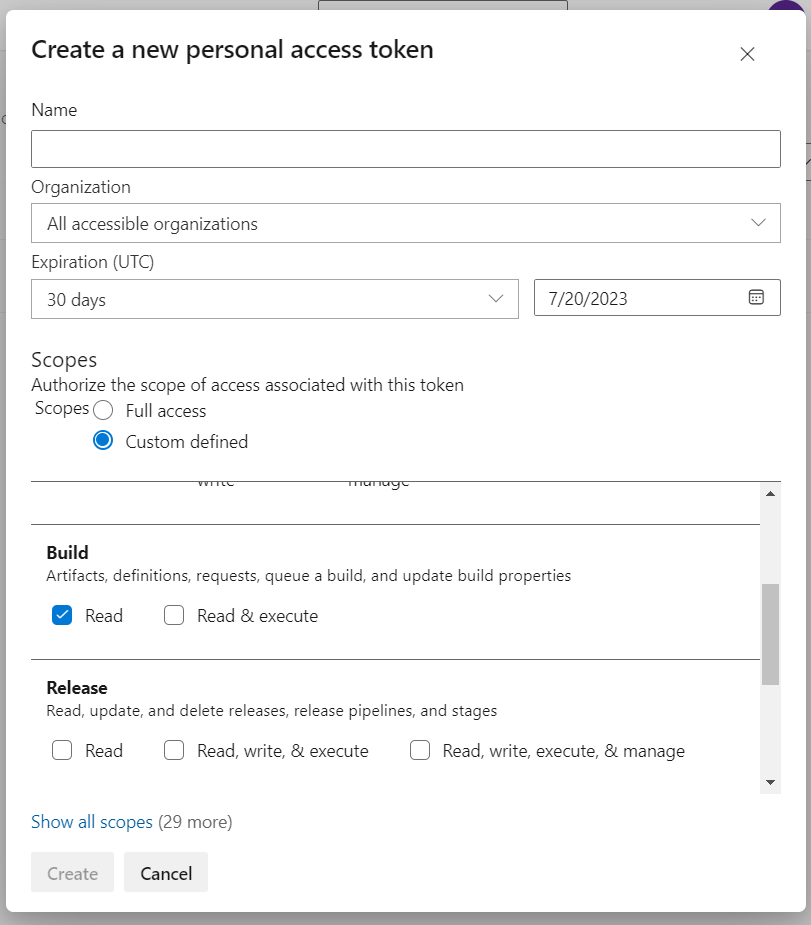
The following steps will help you create a new Personal Access Token:
Navigate to the User Settings in the right corner of the navigation menu.
From the drop-down, select Personal access tokens.
Click on the New Token button and generate a new personal access token with minimal scope. Currently, the App needs the token to Read access to the builds.
Alternatively, you can use this official guide from Microsoft.
Configuration
Once you have got the Personal Access Token, you can proceed with the configuration of Azure DevOps Pipeline triggering. Configuration of Azure DevOps Pipeline triggering is available on all configuration levels:
Global Configurations for Bitbucket admins
Repository Level Configurations
Find our application Post Webhooks on the level that suits your needs best: Global, Project, or Repository.
From the Configurations tab, click

From the Payload type dropdown, select Azure.
After you have specified all the necessary parameters click on the Save button.
Below you can find a short definition of the parameters you have to specify:
Parameter | Definition |
|---|---|
| a link to the pipeline by pattern: |
| specifies where the target pipeline is located:
|
| the personal access token (PAT) used for authentication with Azure DevOps. |
| the branch in the Azure DevOps repository where the pipeline to be triggered is located. |
| additional parameters or variables that need to be passed to the Azure DevOps pipeline when triggering it. |
| allows you to specify the types of events that should trigger the pipeline. |
| allows you to specify the types of events that should trigger the pipeline. |
| the name of the configuration Our advice is to name something meaningful to you and your team so that it can be understood later easier |
| should be enabled if this configuration is going to be used. |
The rest parameters are optional to provide flexibility and customization options to tailor the webhook integration according to your specific needs.
Azure DevOps pipeline parameters
If you want to update the build status in Bitbucket from the Azure DevOps pipeline, you may need to use some defined parameters. For some Bitbucket events, some parameters are not available and as a result, they are not sent to the Azure DevOps pipeline.
Please, make sure that the parameters of the pipeline are settable at the queue time.
Follow this guide from Microsoft and check out our short video explainer.
The following parameters are passed to the pipeline when it is triggered:
Parameter | Definition |
|---|---|
| the Bitbucket project key. |
| the Bitbucket project’s name. |
| the Bitbucket repository slug. |
| the Bitbucket repository's name. |
| the git commit hash. |
| optional commit message. |
| the git branch name. |
| the git source branch for pull request events. |
| the git destination branch for pull request events. |
| the user's (actor) display name. |
| the user's slug. |
| the event type. |
| the id of the pull request (only pull request-related events). |
| the title of the pull request (only pull request-related events). |
| the description of the pull request (only pull request-related events). |
| the state of the pull request (only pull request-related events). |
Demo Video
How to integrate Bitbucket Server with Jenkins Pipelines
This integration enables the triggering of the Jenkins pipeline automatically whenever some changes are pushed to the Bitbucket Server repository, allowing you to build, test, and deploy seamlessly.
This guide is for Post Webhooks for the Bitbucket Atlassian Marketplace application.
Plugins for Jenkins Server
Firstly, you need to install the necessary plugins on your Jenkins Server:
Git Parameter Plug-In (adds Git parameters to the Jenkins pipelines, you can use it to specify the branch to check in or any other things used in the Jenkins pipeline).
Build Authorization Token Root Plugin (allows using the build token for external builds).
Follow this short instruction on installing new plugins in Jenkins:
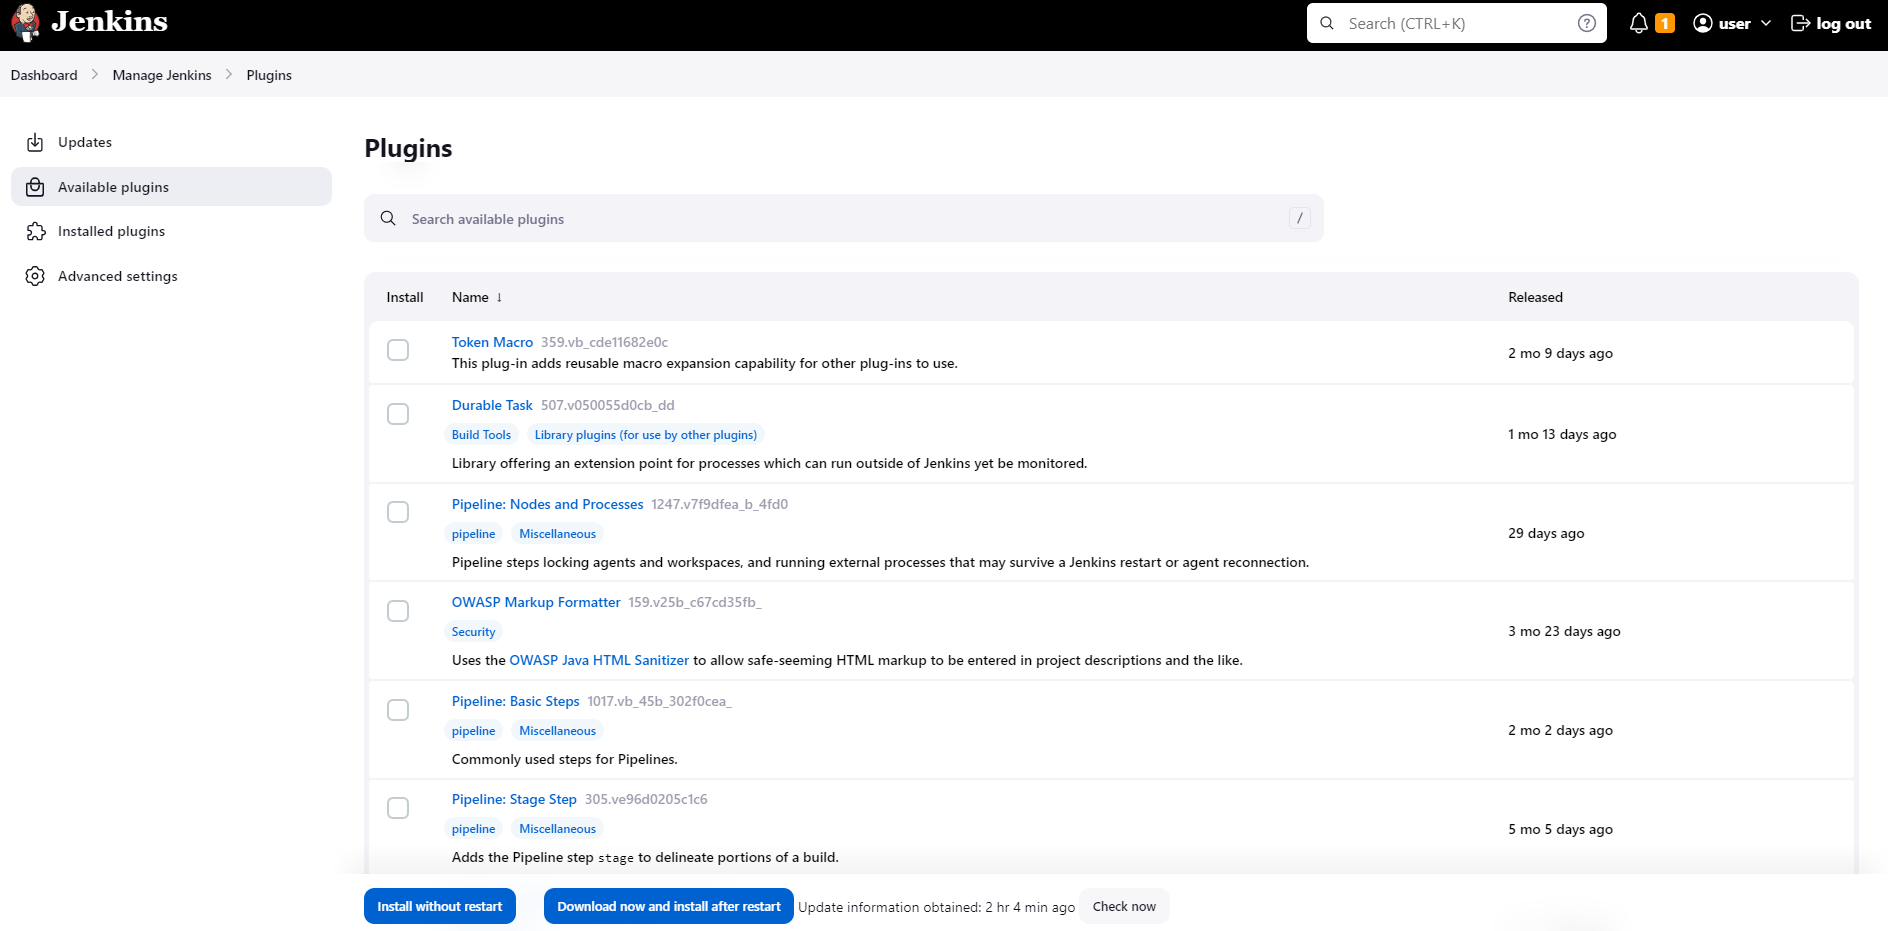
Log in to Jenkins and on the dashboard click on Manage Jenkins in the left sidebar.
Click on Plugins to open the Plugin Manager.
Move to the Available section. Here you can search for necessary plugins using the search bar or browse through the available plugins.
After the plugin installation is complete, Jenkins may prompt you to restart the server for the changes to take effect.
Create a Jenkins Pipeline Job
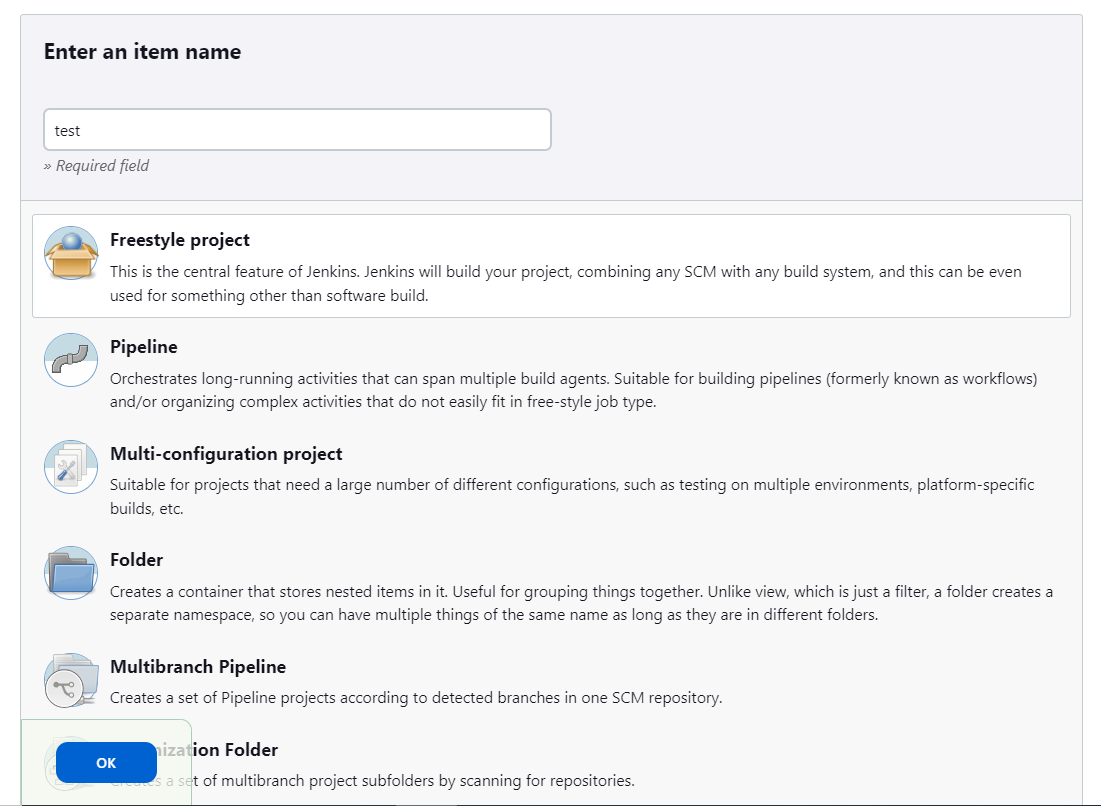
On the Jenkins dashboard, click on New Item in the left sidebar to create a new job.
Give a name to the Job that you are creating.
Select the Freestyle Project (or any other pipeline type) and click on OK.
Add the branch as a Git parameter:
Chose the option This project is parameterized. Click on Add Parameter and select Git Parameter in the drop-down.
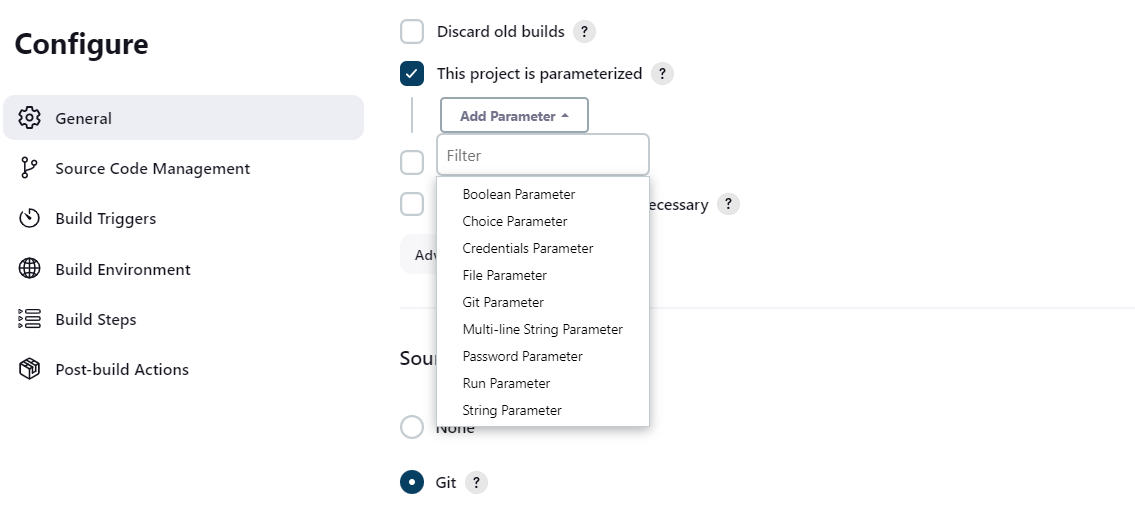
Specify the
Name,Parameter typeandDefault valueof the Git parameter (as it is shown in the screenshot below).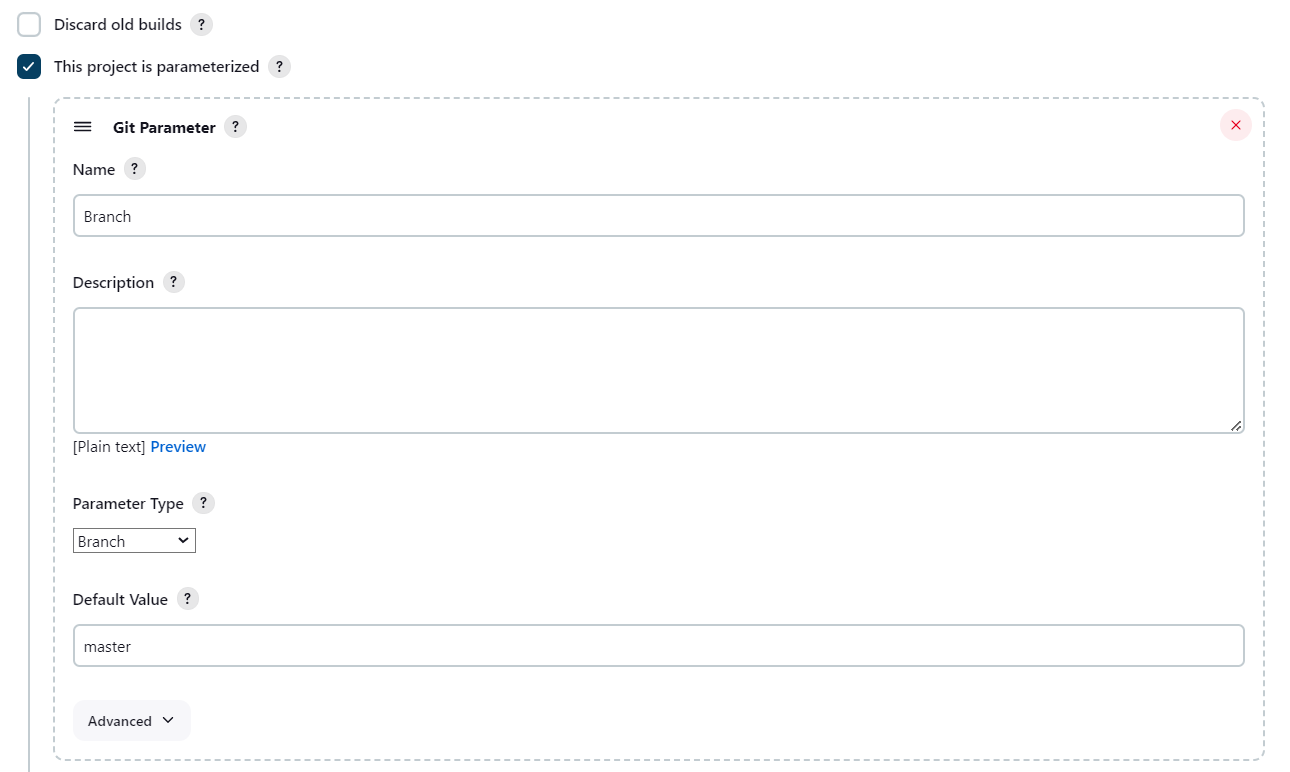
Move to Source Code Management to provide access to the Bitbucket repository:
Select Git option.
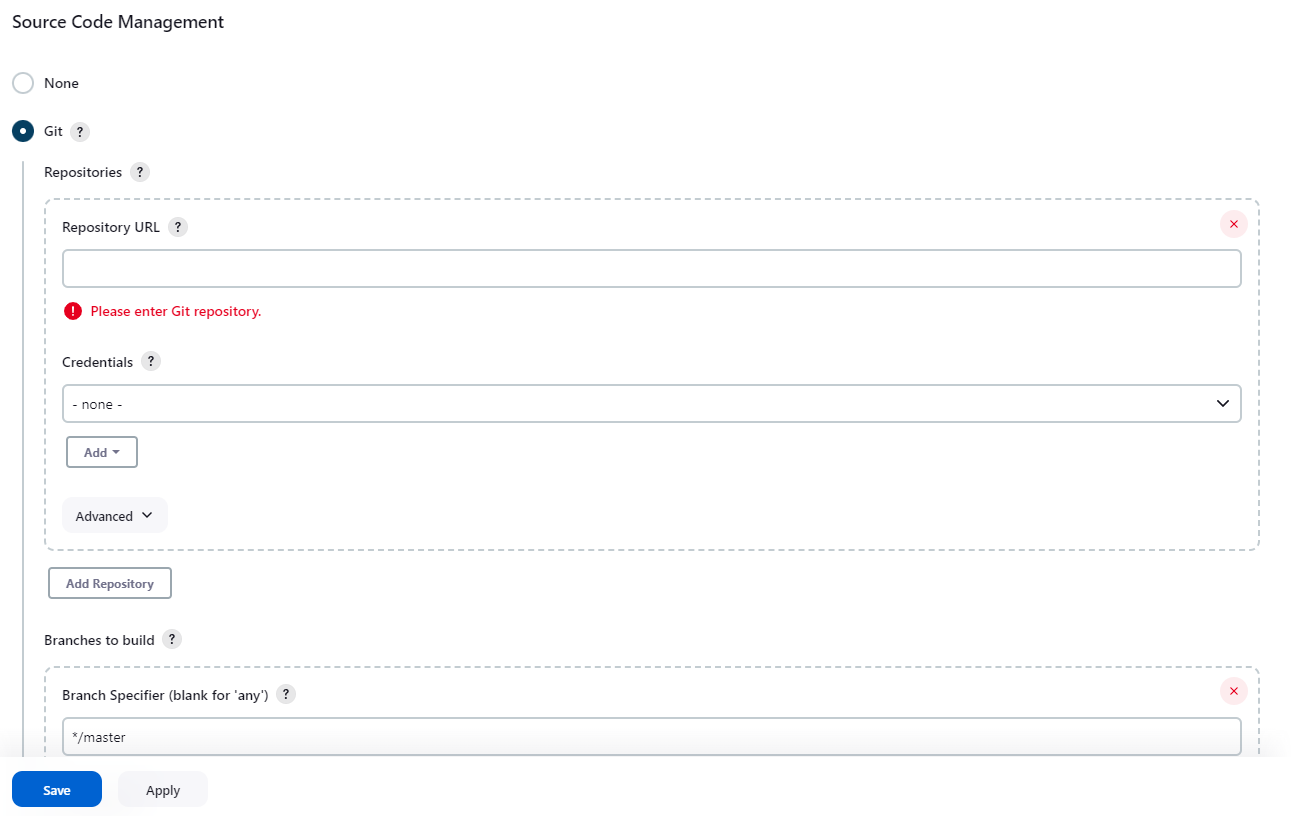
Enter the
Repository URLandCredentialsof your Bitbucket account. We recommend usingURLfrom the Clone section on the Bitbucket side.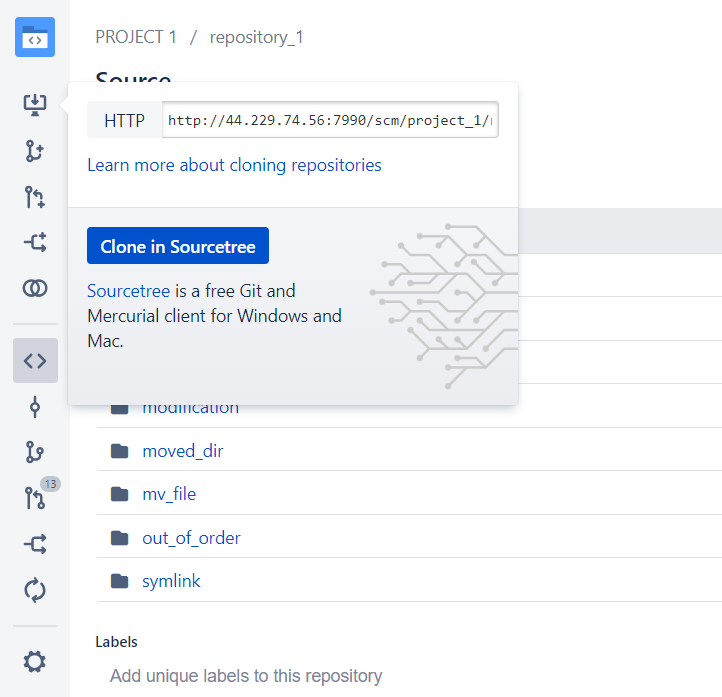
On the Build Triggers section select the option Trigger builds remotely (e.g., from scripts) and create an
Authentication Token.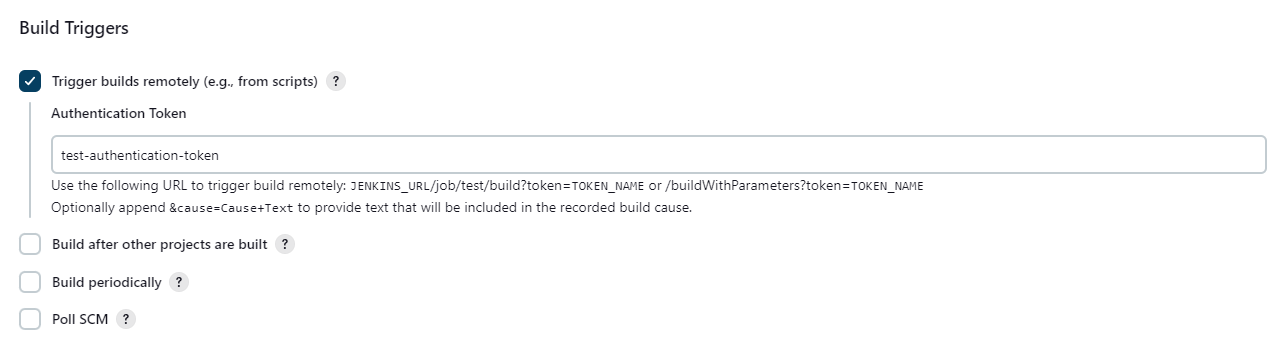
Click on Save button to save the Pipeline Job Configuration.
Now you are ready for the Bitbucket сonfiguration.
Configuration
Navigate to the repository-level configurations of Post Webhooks for Bitbucket app and create a new webhook:
Move to the Bitbucket repository you wish to set up Post Webhooks for Bitbucket app.
Navigate to the Repository settings by clicking on the “gear” button on the left sidebar.
On the Workflow section find our application Post Webhooks.
From the Configurations tab, click

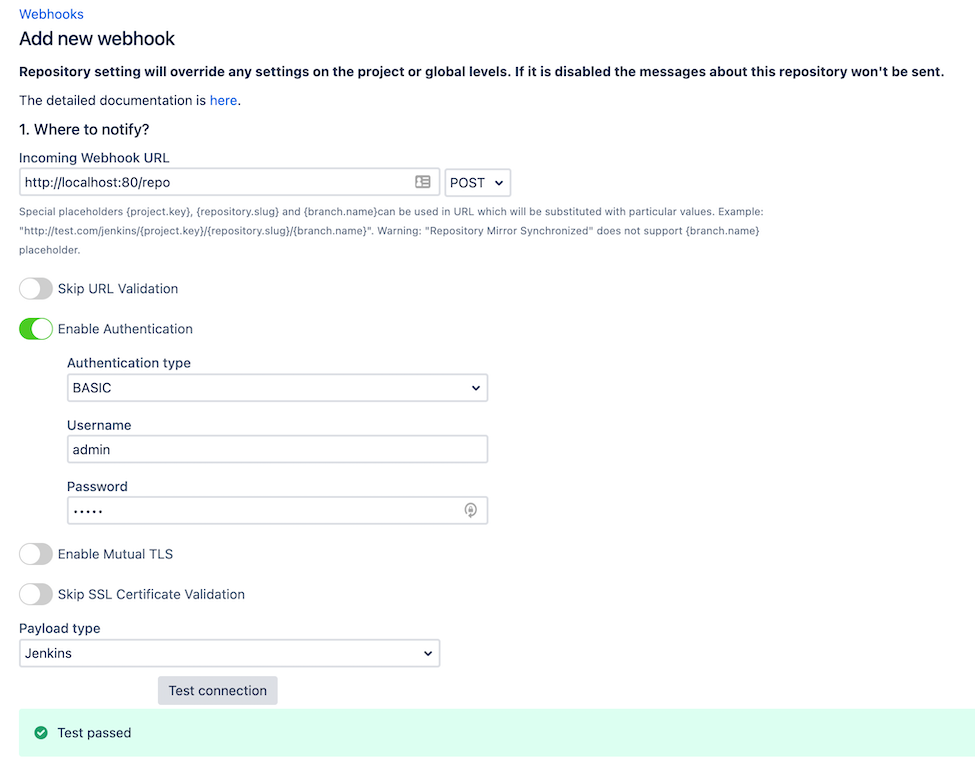
Create a new configuration and specify all the necessary parameters. Use Test Connection button to verify the connectivity between Bitbucket and Jenkins.
To complete webhook creation click on Save button.
Below you can find a short definition of the parameters you have to specify.
Parameter | Definition |
|---|---|
| a link to the Jenkins Pipeline Job by pattern:
For example, |
| this parameter instructs the app to skip the validation of SSL certificates, allowing the connection to be established even if the certificate cannot be verified. |
| allows you to specify the types of events that should trigger the pipeline. |
| allows you to specify the types of events that should trigger the pipeline. |
| the name of the configuration Our advice is to name something meaningful to you and your team so that it can be understood later easier |
| should be enabled if this configuration is going to be used. |
The rest parameters are optional to provide flexibility and customization options to tailor the webhook integration according to your specific needs.
Demo Video
Repository Level Configurations
How to set up Azure DevOps Pipeline triggering from Bitbucket Server?
How to enable notifications from Bitbucket in Microsoft Teams?
How to enable notifications from Bitbucket in Microsoft Teams
Post Webhooks for Bitbucket provides support for Microsoft Teams notifications by allowing you to send real-time notifications to your Microsoft Teams channels whenever certain events occur in your Bitbucket repositories.
You can configure a webhook in Bitbucket to send a payload to a Microsoft Teams Webhook URL whenever a specific event, such as a code push or a pull request merge, takes place.
This guide is for Post Webhooks for the Bitbucket Atlassian Marketplace application.
Microsoft Teams Webhook URL
To generate an Microsoft Teams Workflows app URL in Microsoft Teams, follow this guide:
How to create webhook URL with Workflows app?
Post Webhooks for Bitbucket supports the old and new formats of Microsoft Teams Incoming Webhook URLs. Additionally, it supports Microsoft Teams Workflows URLs.
Workflows app URLs support is available since 7.13.36
Configuration
Once you have the Webhook URL, you can proceed with configuring Microsoft Teams notifications. Configuration of Microsoft Teams notifications is available on all configuration levels:
Global Configurations for Bitbucket admins
Repository Level Configurations
Find our application Post Webhooks on the level that suits your needs best: Global, Project, or Repository.
From the Configurations tab, click

Input generated webhook in the
Incoming Webhook URLfield and specify all the necessary parameters (see table below).Click on the Save button.
Below you can find a short definition of the parameters you have to specify:
Parameter | Definition |
|---|---|
| created Microsoft Teams Webhook URL. |
| allows you to specify the types of events that should trigger the pipeline. |
| allows you to specify the types of events that should trigger the pipeline. |
| the name of the configuration Our advice is to name something meaningful to you and your team so that it can be understood later easier |
|
|
The rest of the parameters are optional to provide flexibility and customization options.
How to choose an authentication type
Post Webhooks for Bitbucket app provides the ability to add an authentication mechanism to the webhook requests, ensuring that only authorized parties can access the webhook endpoint.
The choice of authentication type, Basic, Bearer, or Kerberos, depends on the specific authentication mechanism you have in place for your Bitbucket server. Those authentication types differ in the way they handle authentication and provide access to resources.
This guide is for the Post Webhooks for Bitbucket Atlassian Marketplace application.
Overview
Basic Authentication
Basic authentication is a widely supported authentication method that uses a username and password to authenticate requests:
credentials are sent in the HTTP request headers, typically encoded in Base64;
widely supported and relatively easy to implement;
may be less secure compared to other authentication methods as the credentials are sent with each request.
Bearer Authentication
Bearer authentication uses a bearer token to authenticate requests. This type of authentication is commonly used with APIs that require token-based authentication:
the bearer token is obtained through a separate authentication process (e.g., OAuth) and is then included in the request headers.
token-based authentication is stateless, meaning the server does not need to store session information.
provides more flexibility and scalability compared to basic authentication, as tokens can have different expiration times and can be easily revoked.
Kerberos Authentication
Kerberos authentication is available since 3.22.12
Kerberos is a network authentication protocol that uses tickets to authenticate users and services in a secure manner:
provides single sign-on capabilities, allowing users to authenticate once and access multiple resources without re-entering their credentials;
relies on a trusted third-party authentication server (Kerberos Key Distribution Center or KDC) and uses symmetric key cryptography;
requires Kerberos client libraries to be installed and configured on the client and server machines;
offers strong security and is commonly used in enterprise environments;
requires a username and password for authentication.
Kerberos is a experimental API.
Be sure Bitbucket was started with proper configuration e.g.:
JAVA_OPTS="-Djavax.net.ssl.trustStore=/etc/pki/java/cacerts -Djava.security.krb5.conf=/etc/krb5.conf -Djavax.security.auth.useSubjectCredsOnly=false"
Afterwards, you can specify a username and passwordin the authentication section of the configuration screen.
Configuration
Enabling Authentication option is available on all configuration levels during the webhook creation:
Global Configurations for Bitbucket admins
Repository Level Configurations
Find our application Post Webhooks on the level that suits your needs best: Global, Project, or Repository.
From the Configurations tab, click

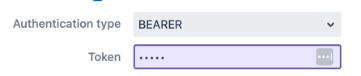
Tick the button to Enable Authentication
Choose the Authentication type and enter credentials to authenticate requests.
After you have specified the rest of the necessary parameters click on the Save button.
How to rerun data migration
If the migration process encounters errors or fails to transfer all the necessary data, you can rerun the migration to rectify the issues and ensure a complete and accurate migration. The ability to rerun the migration process allows for a smoother transition from the old version to the new version of the app, minimizing any disruptions to your webhook integrations.
Rerun migration functionality is available only for Bitbucket admins.
This guide is for the Post Webhooks for Bitbucket Atlassian Marketplace application.
You have to navigate to the global settings of the Bitbucket Post Webhook app and check out the Danger zone:
Move to the Bitbucket Administration section (“gear” button in the right corner of the navigation menu).
Navigate to the Add-ons section and find our application Post Webhooks.
On the Global Configuration page, navigate to the Maintenance tab.
Click the Database button to see the Danger zone.
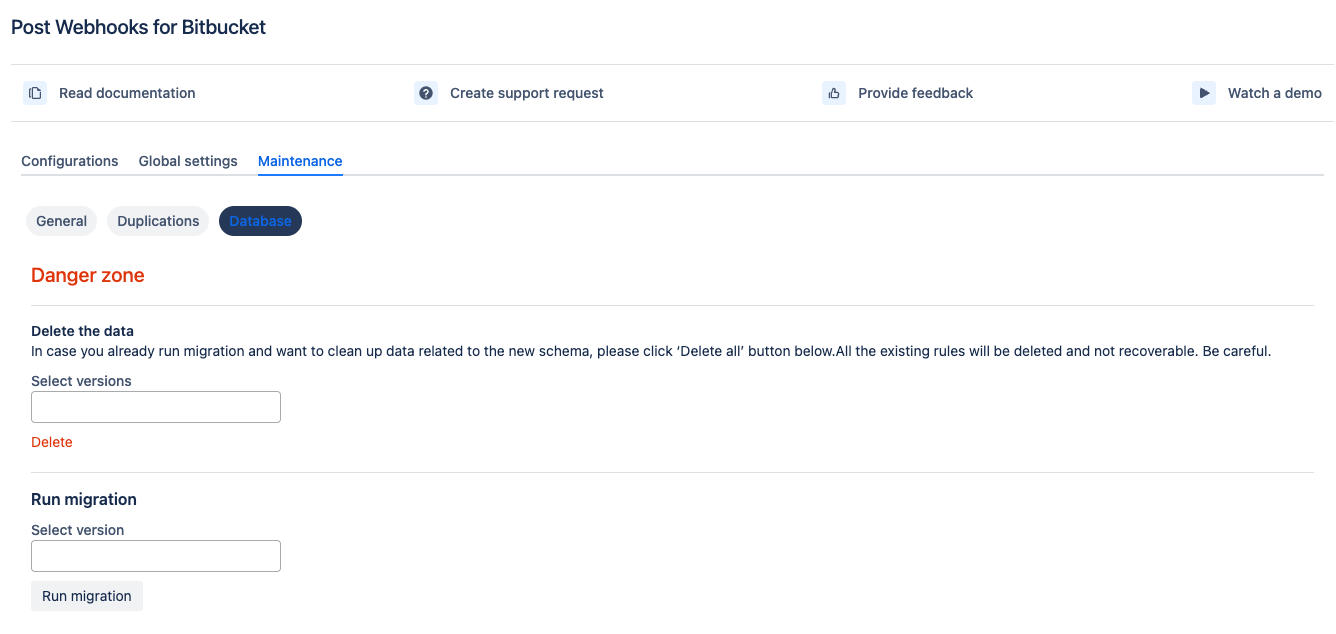
On the Danger zone, you can:
delete allexisting rules (recommended to run before the migration re-run); if you don't do this, the rules will be duplicated.migrateall rules from the old storage to the new one.
We also recommend enabling the debug logging for the migration duration (in case there are issues).
How Post Webhooks for Bitbucket sends data outside
This guide is for the Post Webhooks for Bitbucket Atlassian Marketplace application.
Outgoing API
Post Webhooks for Bitbucket sends data outside using API in a particular format. The API may differ slightly depending on the version you use (we do treat this API as a feature and do our best, including having integration tests, to maintain backward compatibility).
The best is to run ngrok http 9999 in a terminal window, copy generated the HTTP URL, and use it in the Post Webhooks for Bitbucket configuration. Afterwards, open http://127.0.0.1:4040/inspect/http to inspect all data sent to ngrok url.
Common types
Pull request events
Push event
Build status update events
HTTP header values
Here is our event type to header value map.
Examples
Repository push
Pull request approver
When the pull request is approved the event contains the approver.
How to get configurations using REST APIs
This guide is for the Post Webhooks for Bitbucket Atlassian Marketplace application.
API for 2.5.3 and lower versions
Prior to version 3.5.5 configurations exist only at the repository level and there is no API to get all available configurations at one REST call.
API:
Returns a list of configurations per repository.
Full description at Atlassian Bitbucket Post Webhook API
API for 3.5.5 and newer versions
All operations respect user permissions. If the user doesn’t have permissions to a project/repository he can’t get/save/update/delete configurations at particular levels.
Get all configurations:
CODEResponse:
CODEGet all configurations for the project
CODEResponse:
CODEGet all configurations for the repository
CODEResponse:
CODEDelete configuration by ID:
CODEResponse:
CODEGet configuration by ID
CODEResponse:
CODESave configuration
CODEResponse:
CODEUpdate configuration
CODEResponse:
CODE
Configuration levels
Configuration level is defined by two properties in the root of the record:
Global level
CODEProject level:
CODERepository level:
CODE
Configuration affections
Configuration can affect only specific projects/repositories. By default configuration affect the level at which it's specified but the scope can be narrowed by providing the “sources” property.
Example:
Configuration handles the events in all projects/repositories.
Configuration handles the events in all repositories from “PROJECT_1“ and repository “rep_2“ from the project “PROJECT_2“.
Configuration handles the events from repositories “rep_1“ and “rep_2“ from the project “PROJECT_1“.
How to set up Azure DevOps Pipeline triggering from Bitbucket Server?
How to enable notifications from Bitbucket in Microsoft Teams?
Global Configurations for Bitbucket admins
Repository Level Configurations
Updated:
How to manage configurations using REST APIs
This guide is for the Post Webhooks for Bitbucket Atlassian Marketplace application.
Managing configurations using the Post Webhooks for Bitbucket APIs allows you to programmatically create, update, retrieve, and delete webhook configurations.
Here's an overview of how to manage configurations using the APIs.
Version 2
REST API base URL: http://localhost:7990/bitbucket/rest/webhook/2.0/configurations
Configuration level
Configuration level depends on "projectKey" and "repositorySlug" properties.
Global level - properties are not set.
Project key -
"projectKey"is set,"repositorySlug"is not set.Repository level - both properties are set.
Possible event types
It can be gotten from http://localhost:7990/bitbucket/rest/webhook/2.0/configurations/event-types
Full payload
Smallest payload
The smallest payload which can be used (corresponding to the Version 1)
Get configurations
projectKey,repositorySlug- optional parameters
Create configuration
POST http://localhost:7990/bitbucket/rest/webhook/2.0/configurations payload
Update configuration
PUT http://localhost:7990/bitbucket/rest/webhook/2.0/configurations/ID payload
Delete configuration
DELETE http://localhost:7990/bitbucket/rest/webhook/2.0/configurations/ID
Disable batch of configurations
POSThttp://localhost:7990/bitbucket/rest/webhook/2.0/configurations/disablePAYLOAD
Enable batch of configurations
POSThttp://localhost:7990/bitbucket/rest/webhook/2.0/configurations/enablePAYLOAD
Delete a batch of configurations
POSThttp://localhost:7990/bitbucket/rest/webhook/2.0/configurations/deletePAYLOAD
Where PAYLOAD contains a list of IDs: {"ids": [ID1, ID2, ID3, ....]}
Version 1
Get existing post webhooks for a specified project
URL
/rest/webhook/1.0/projects/$PROJECT/repos/$REPO/configurations
Method
GET
Response
Success Response:
Code: 200
Content:CODE
Error Response:
Code: 404 NOT FOUND
Content:JSOR
Code: 401 UNAUTHORIZED
Content:JS
Sample Call:
CODE
Create post webhook
URL
/rest/webhook/1.0/projects/$PROJECT/repos/$REPO/configurations
Method:
POSTData Params
JSSuccess Response:
Code: 201
Content:JS
Error Response:
Code: 401 UNAUTHORIZED
Content:CODE
OR
Code: 400 BAD REQUEST
Content:CODE
Sample Call:
CODENotes:
This endpoint, the creation of a post webhook, can also be called as a 'PUT' request to maintain backward compatibility. However, The proper API verb for the creation of a new resource is 'POST'
Update a post webhook by ID
URL
/rest/webhook/1.0/projects/$PROJECT/repos/$REPO/configurations/$WEBHOOK_ID
Method:
PUTData Params
CODESuccess Response:
Code: 200
Content:CODE
Error Response:
Code: 401 UNAUTHORIZED
Content:CODE
OR
Code: 400 BAD REQUEST
Content:CODE
Sample Call:
CODENotes:
This endpoint, the update of an existing post webhook, can also be called as a 'POST' request to maintain backward compatibility. However, The proper API verb for updates to an existing resource is 'PUT'
Delete a post webhook by ID
URL
/rest/webhook/1.0/projects/$PROJECT/repos/$REPO/configurations/$WEBHOOK_ID
Method:
DELETESuccess Response:
Code: 204
Error Response:
Code: 401 UNAUTHORIZED
Content:CODE
OR
Code: 404 NOT FOUND
Content:CODE
Sample Call:
CODE
Examples
Create a webhook on the pull request created or re-scoped.
How to disable Old REST APIs?
You can disable Old REST APIs on the Global configuration page:
Move to the Bitbucket Administration section (“gear” button in the right corner of the navigation menu).
Navigate to the Add-ons section and find our application Post Webhooks.
On the Global Configuration page, navigate to the Global Settings tab.
Tick the checkbox Disable Old Rest API and click on the Save button.
Last updated:
How to fix RepositoryMovedException error
This guide is for the Post Webhooks for Bitbucket Atlassian Marketplace application.
The RepositoryMovedException issue is an exception that can occur when using the Post Webhooks for Bitbucket app. It indicates that the repository associated with a webhook configuration has been moved, renamed and deleted. This can happen when repositories are renamed, moved to a different project, or deleted altogether.
This parameter you may see in the older versions of Post Webhooks for Bitbucket before our app became capable of updating configurations when a repository was moved or removed (since 3.12). We added new parameter Disable configuration if project/repository was moved/deleted to the Global settings tab on the Global configurations page.
The best decision here is to update the app to the latest version and fix the highlighted rule on the Global configurations page.
If you see in the Bitbucket logs a RepositoryMovedException it means you have a configuration rule for a repository that was renamed, moved or deleted.
There are 2 ways to fix this error:
Remove the rule for the old repository key.
Change the configuration rule repository key to the new repository key (works only for renamed or moved repositories).
We propose to delete the rule following the steps below.
Here is an example of how to call REST APIs of Bitbucket Server (works the same way for the 3rd party Apps):
Make sure you are the Bitbucket Global administrator.
Get all configurations using GET http://localhost:7990/bitbucket/rest/webhook/2.0/configurations
Find the necessary repositories and not done the rule ID.
Delete the configuration for old repositories using DELETE http://localhost:7990/bitbucket/rest/webhook/2.0/configurations/{id} where id is the id of the rule.
How to use Mutual TLS for Jenkins and Bitbucket integration
Post Webhooks for Bitbucket supports mutual TLS. In this guide you will find more details on how to set it up.
This guide is for the Post Webhooks for Bitbucket Atlassian Marketplace application.
Mutual TLS, also known as client certificate authentication, adds an extra layer of security to the communication between the app and the webhook endpoint. With mutual TLS, both the client (the app) and the server (the webhook endpoint) authenticate each other using digital certificates.
Enabling mutual TLS ensures that only trusted clients with valid and verified certificates can establish a connection with the webhook endpoint.
Configurations
This functionality is available on all configuration levels:
Global Configurations for Bitbucket admins
Repository Level Configurations
Find our application Post Webhooks on the level that suits your needs best: Global, Project, or Repository.
From the Configurations tab, click

Tick the checkbox Enable Mutual TLS and specify all the necessary parameters.
Complete the rest configuration parameters according to your needs.
After you have specified all the necessary parameters click on the Save button.
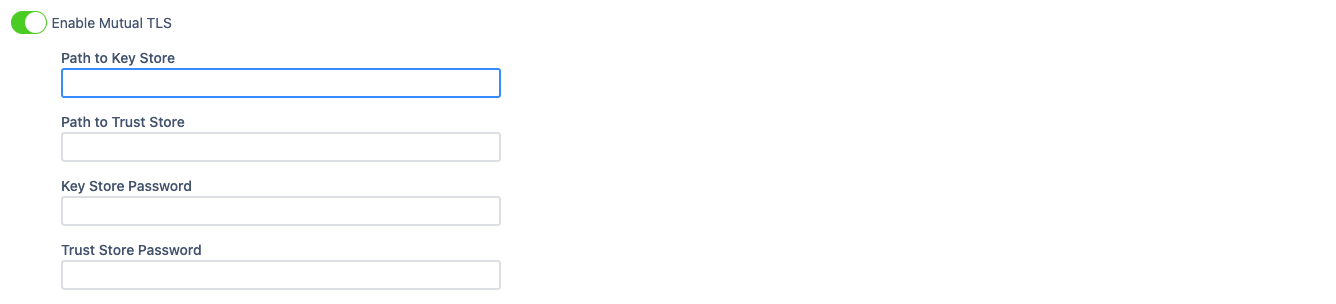
Below you can find a short definition of each parameter you have to specify to enable Mutual TLS:
Parameter | Definition |
|---|---|
| contains the private key and the associated certificate used for Mutual TLS authentication. |
| contains trusted certificates used to verify the authenticity of other parties during Mutual TLS authentication. |
| the password required to access the Key Store file. |
| password needed to access the Trust Store file. |
Mutual TLS for Jenkins integration
Server key store and trust store
Create the directory “server/cert”, then run the next commands
Client key store and trust store
Create directory “client/cert”
Start Jenkins with certificates
To start Jenkins we use a docker image with the required parameters.
Jenkins accepts connection on HTTP and HTTPS ports.
-Djavax.net.ssl.trustStore=/cert/truststore.jks -Djavax.net.ssl.trustStorePassword=secret replaces default Java trust store
--httpsKeyStore=/cert/identity.jks --httpsKeyStorePassword=secret specifies key store for Jenkins
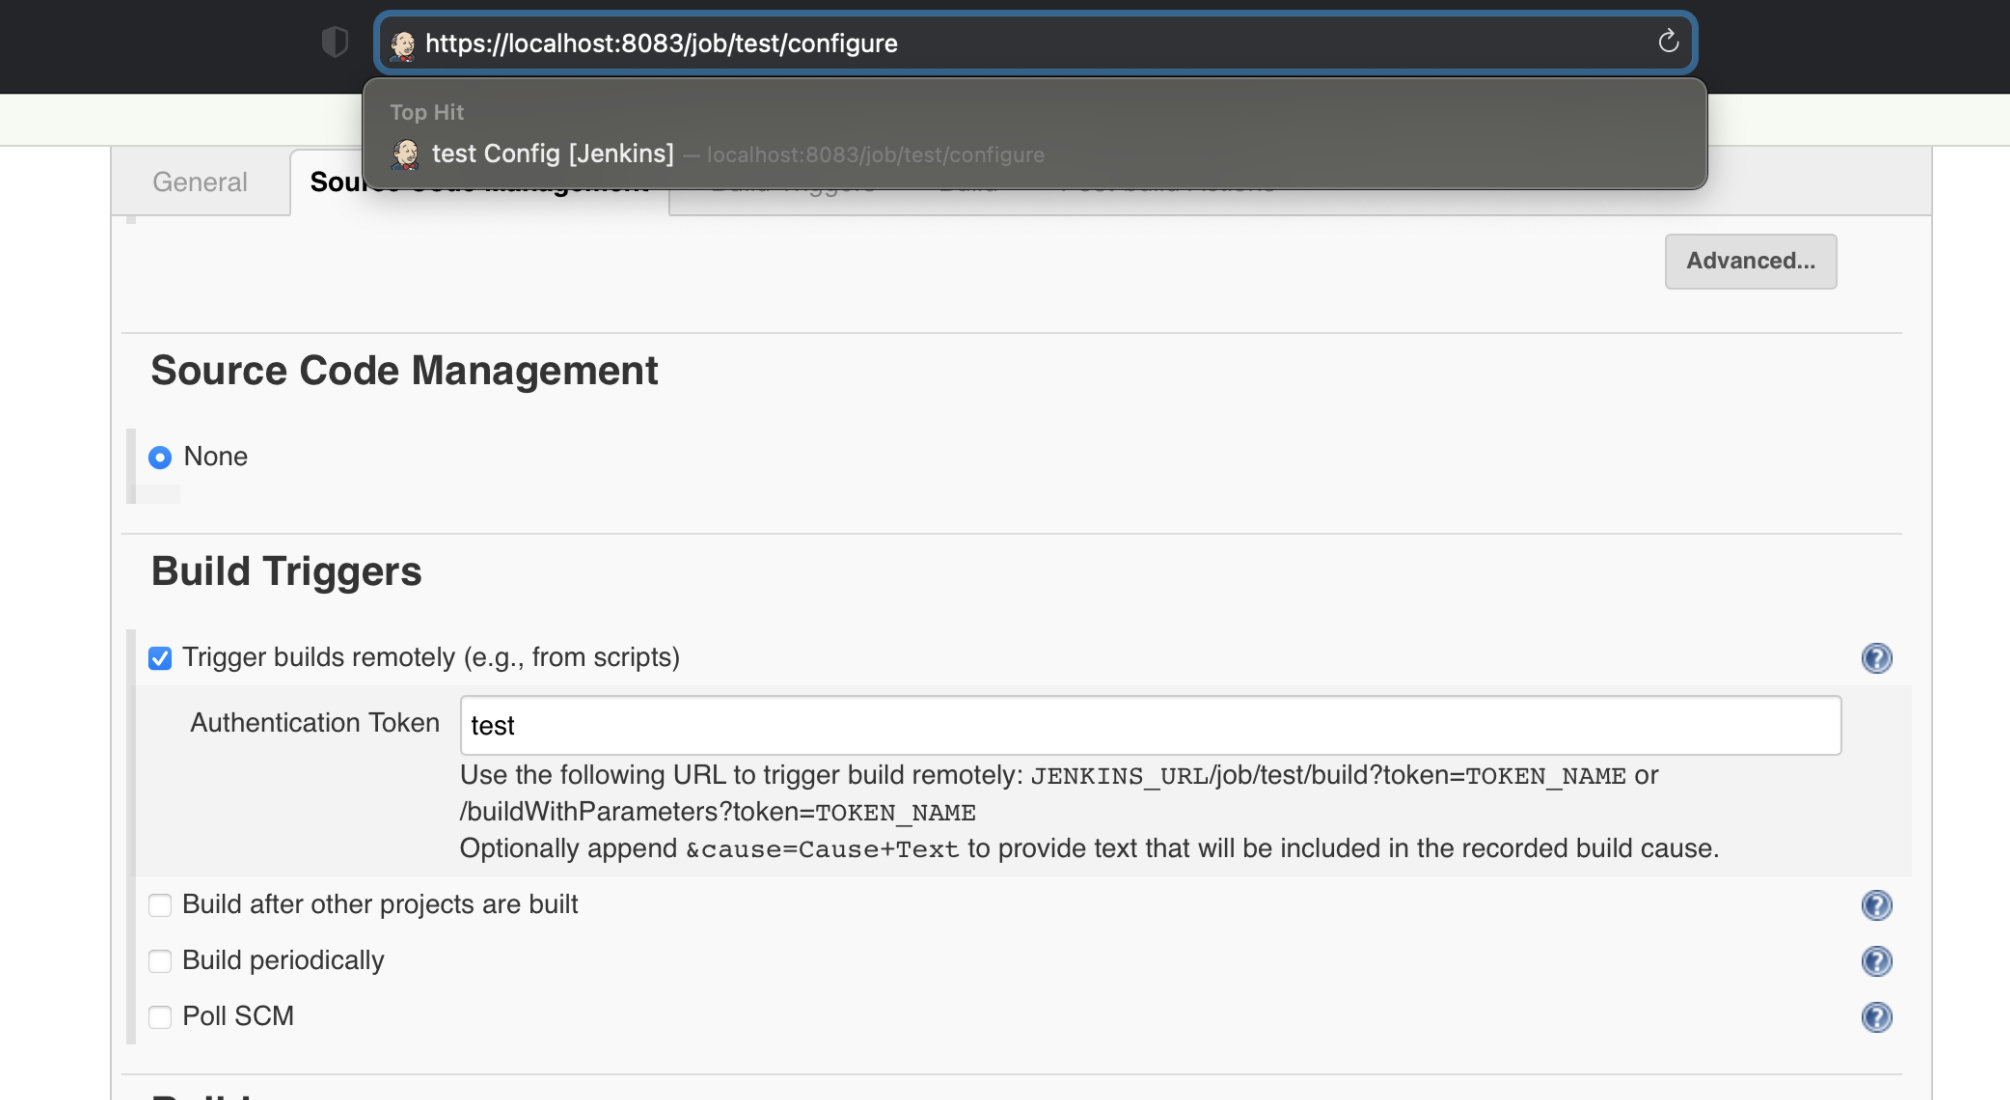
After the setup of the project is complete, a build can be triggered by REST: JENKINS_URL/job/test/build?token=TOKEN_NAME or /buildWithParameters?token=TOKEN_NAME
Post Webhooks for Bitbucket plugin
To check if the URL can be handled Test connection button can be used.
In all cases, authentication is required.
HTTPS URL without additional parameters:
HTTPS URL with Skip SSL Certificate Validation:
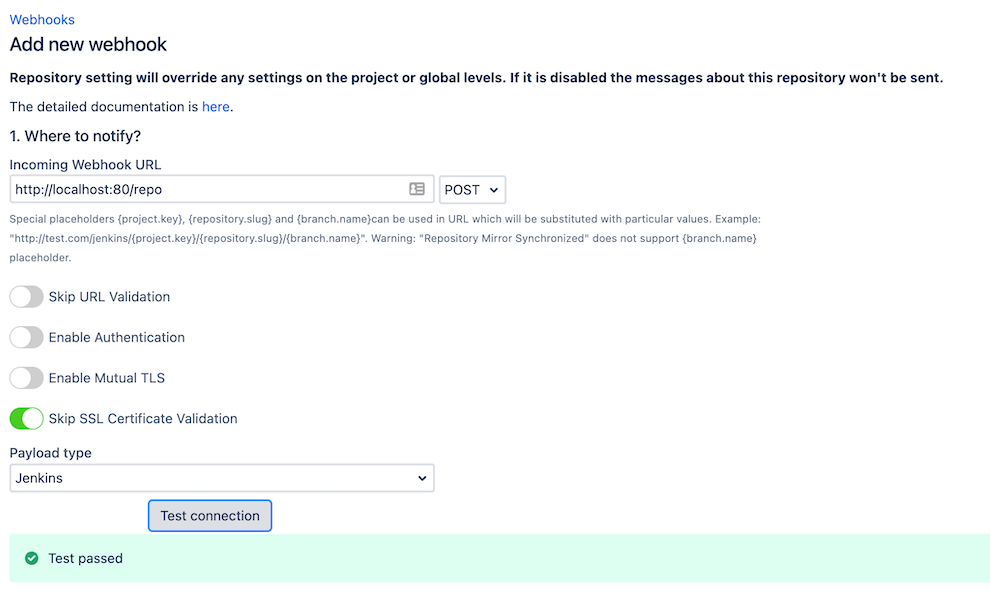
HTTPS URL with Enable Mutual TLS:
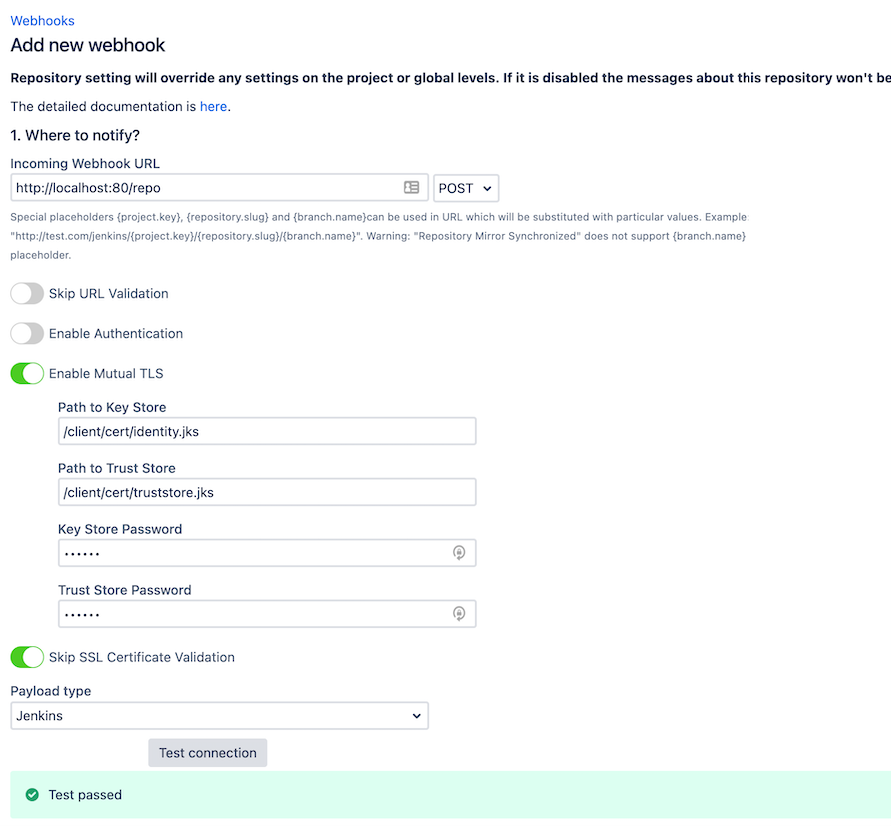
Key Store and Trust Store files should be on the same box where Bitbucket is running:
Path to Key Store -
client/cert/identity.jksPath to Trust Store -
client/cert/truststore.jksKey Store and Trust Store Passwords - secret.
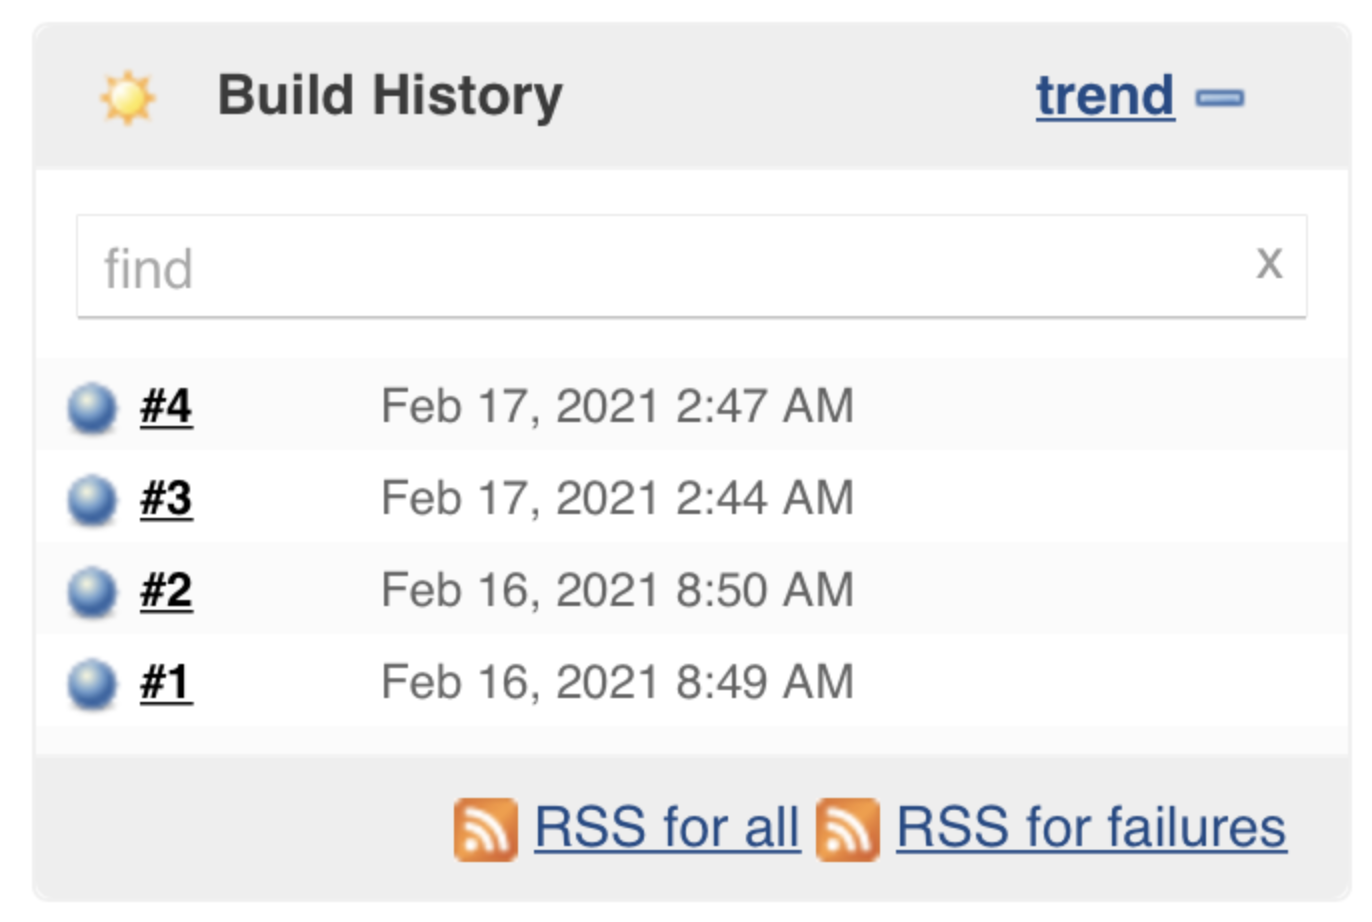
Results can be checked on the Jenkins platform:
To learn more follow the links:
https://hub.docker.com/_/jenkins/
https://support.cloudbees.com/hc/en-us/articles/203821254-How-to-install-a-new-SSL-certificate
https://stackoverflow.com/questions/40126736/enable-https-in-jenkins
How to enable debug-level logging
Debugging allows you to identify and resolve issues or bugs. When users encounter unexpected behaviour, errors, or performance issues, debugging helps pinpoint the root cause and provides valuable insights for resolving the problem.
This guide is for the Post Webhooks for Bitbucket Atlassian Marketplace application.
If you need to debug the app, please:
Reproduce the issue you are having.
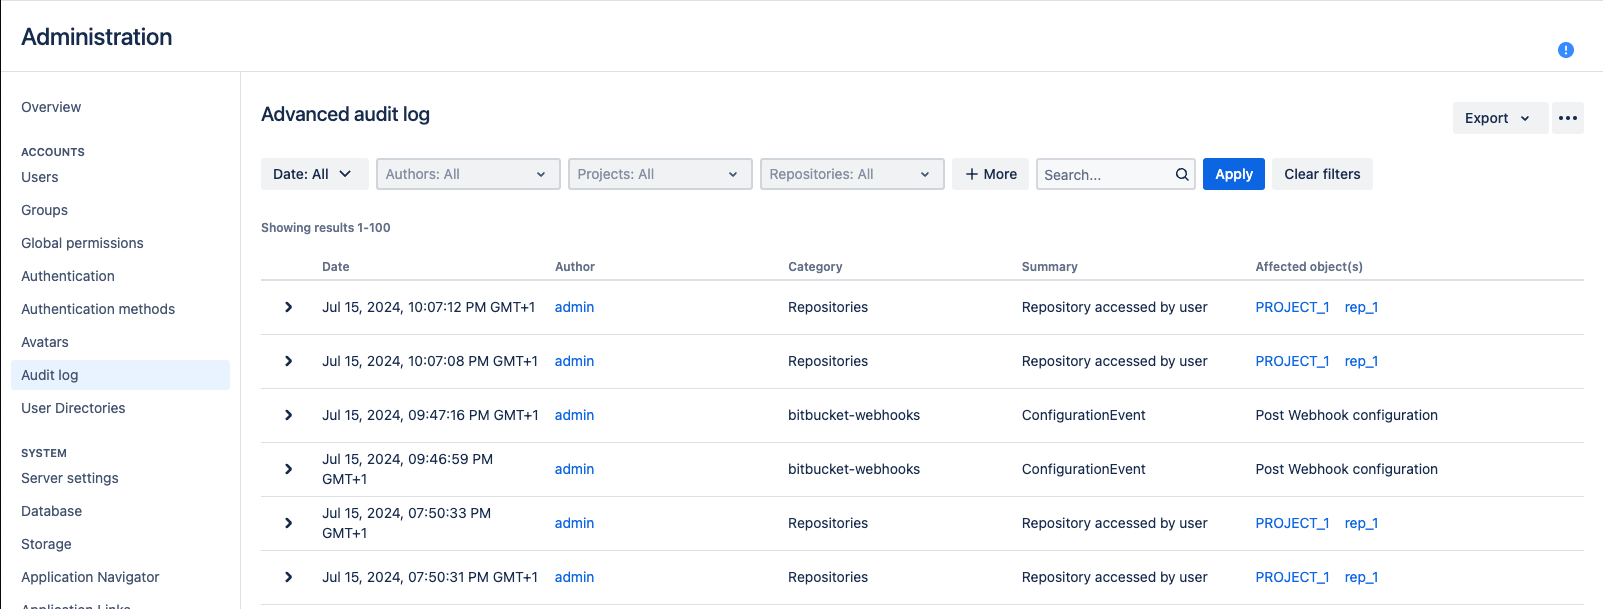
Navigate to the Administration → ACCOUNTS → Audit Log section.
Export the support zip or Bitbucket log file and send it to us.
How to use query string parameters
This guide is for the Post Webhooks for Bitbucket Atlassian Marketplace application.
Your destination URL may contain the query string parameters, which are substituted during each event processing.
The following query string parameters are supported:
repository.slug- the repository slugproject.key- the project keybranch.name- the branch namepullrequest.frombranch- the from branch name of the pull request (relative git path) - f.e. refs/heads/bug/someBugpullrequest.frombranch.name- the from-branch name - f.e.someBug.pullrequest.tobranch- the to-branch name of the pull request (relative git path) - f.e. refs/heads/masterpullrequest.tobranch.name- the to-branch name - f.e.master.pullrequest.url- the pull request URL
How to update settings using REST APIs
Details about configuration updates using REST APIs.
This guide is for the Post Webhooks for Bitbucket Atlassian Marketplace application.
Payload
Here you can find the main configuration JSON schema.
Schema
Parameters.
Pair
projectKeyandrepositorySlugdefine a configuration level.projectKeyis not set andrepositorySlugis not set - Global-level configuration affects all repositories in Bitbucket.projectKeyis set andrepositorySlugis not set - Project-level configuration, affects all repositories in the given project.projectKeyis set andrepositorySlugis set - Repository level configuration.projectKeyandrepositorySlugmust match the existing project and repositories. Configuration without projectdestinationsfor now can contain only one entry which contains the URL.payloadTypecan be one of theJenkins, Azure, Teams, Bitbucket. Corresponding payload is generated based on the type.
Possible eventTypes values
Payload sample
REST API
Create/update configuration
Method POST BITBUCKET_BASE_URL/rest/webhook/latest/configurations
Get all configurations
Method GET BITBUCKET_BASE_URL/rest/webhook/latest/configurations
Get Project configurations
Method GET BITBUCKET_BASE_URL/rest/webhook/latest/configurations?projectKey={PROJECT_KEY}
Get Repository configurations
Method GET BITBUCKET_BASE_URL/rest/webhook/latest/configurations?projectKey={PROJECT_KEY}&repositorySlug={REPOSITORY_SLUG}
Search configurations by project/repository, pagination
Method POST BITBUCKET_BASE_URL/rest/webhook/latest/configurations/pagination
Payload schema:
Sample:
Get configuration
Method GET BITBUCKET_BASE_URL/rest/webhook/latest/configurations/{ID}
Delete configuration
Method DELETE BITBUCKET_BASE_URL/rest/webhook/latest/configurations/{ID}
Get supported event types
Method GET BITBUCKET_BASE_URL/rest/webhook/latest/configurations/event-types
X-Event-Key header values
Below you can find the map of event types and corresponding Bitbucket X-Event-Key headers.
How to delete duplicated items
A guide on how to delete duplicated items in Post Webhooks for Bitbucket
This guide is for the Post Webhooks for Bitbucket Atlassian Marketplace application.
Search duplications
As a global Bitbucket admin, navigate to the System settings → Post webhooks → Maintainance → Duplications.
There you can define the attributes to compare, the page size and filter by the Bitbucket project and repository.
After you enter your filters, press the Search button.
For each entry, you can see how many duplicates exist. Check the column “Duplications count“.
We recommend using the following attributes:
URL
events
Project
Repository
Delete duplications
After you find your duplicates, select the row(s) by using the checkbox in the first column and press the main delete button or the delete button in each row. This operation will delete all duplicates and leave 1 rule.
Then leave the last updated active rule.
Use case: Automated Build and Deployment Processes
One of the key use cases for the Post Webhooks for Bitbucket app is to facilitate automated build and deployment processes.
Here's how the app can be leveraged to streamline this workflow:
Setting up Webhooks: configure webhooks in Bitbucket to trigger events whenever certain actions occur in your repositories, such as code pushes or pull request merges. These webhooks can be configured at the global, project, or repository level, providing flexibility in defining the scope of automation.
Integration with CI/CD Systems: utilize the app's webhook functionality to seamlessly integrate Bitbucket with your preferred Continuous Integration and Continuous Deployment (CI/CD) systems, such as Jenkins, Azure DevOps, or other similar tools. When a webhook event is triggered, it can be used to initiate automated build and deployment processes in your CI/CD pipeline.
Triggering Builds: Upon receiving a webhook event, the CI/CD system can automatically fetch the latest code changes from Bitbucket, compile/build the code, run tests, and generate artefacts as required.
Deployment Automation: Once the build and testing phases are successfully completed, the CI/CD system can automatically deploy the application to the desired target environment, whether it's a development, staging, or production environment. This automation reduces manual intervention and potential errors in the deployment process.
Customization and Flexibility: With the app's ability to send JSON payloads to external systems, you can extend the automation capabilities even further. For example, you can trigger custom scripts or serverless functions to perform specific actions during the build or deployment process, such as environment provisioning, database migrations, or configuration updates.
By leveraging the Post Webhooks for Bitbucket app, you can automate the build and deployment processes of your applications, reducing manual effort, minimizing human error, and promoting a more efficient and reliable software delivery pipeline.
How to set up Azure DevOps Pipeline triggering from Bitbucket Server?
How to integrate Bitbucket Server with Jenkins Pipelines?
How to enable notifications from Bitbucket in Microsoft Teams?
Use case: Automated Testing Processes
As part of the CI/CD pipeline triggered by the webhook event, you can incorporate automated testing processes, including unit tests, integration tests, or even performance tests. This helps ensure the quality and reliability of your software before deployment.
The Post Webhooks for Bitbucket app offers features that can be utilized for streamlining automated testing within your development workflow:
Configuring Webhooks: Set up webhooks in Bitbucket to trigger events whenever specific actions occur in your repositories, such as code commits, pull request merges, or branch updates. These webhooks can be customized based on your testing requirements, allowing you to target relevant events for triggering automated tests.
Integration with Testing Frameworks: Integrate the app's webhook functionality with your preferred testing frameworks, such as Selenium, JUnit, or PyTest, to automate the execution of tests. When a webhook event is triggered, it can act as a signal to initiate the automated test suite.
Test Execution: Upon receiving a webhook event, the testing framework can automatically fetch the relevant code changes from Bitbucket and execute the designated tests. This includes running unit tests, integration tests, regression tests, or any other tests deemed necessary for validating the functionality and quality of your software.
Continuous Feedback: Integrating the app with your testing framework enables a continuous feedback loop. Any failures or issues identified during the automated testing process can be reported back to the development team in real-time. This allows for prompt investigation, bug fixing, and iterative improvement of the codebase.
Custom Testing Scenarios: The app's ability to send JSON payloads to external systems allows for custom testing scenarios. You can configure webhooks to trigger actions in external systems or tools used for testing, such as test environment provisioning, data setup, or test data generation. This flexibility enables you to create comprehensive and tailored testing workflows.
Post Webhooks for Bitbucket app helps ensure the quality and reliability of your software, while saving time and effort through automated test execution and result analysis.
How to set up Azure DevOps Pipeline triggering from Bitbucket Server?
How to integrate Bitbucket Server with Jenkins Pipelines?
How to enable notifications from Bitbucket in Microsoft Teams?
Use case: Effective Coordination across Development
The Post Webhooks for Bitbucket app provides features that enable effective coordination across the development process within your Bitbucket repositories.
Real-time Communication: By configuring webhooks, the app can send real-time notifications to the collaboration platform Microsoft Teams, providing instant updates to team members. This enables effective communication and keeps everyone in the loop regarding code changes, pull requests, builds, deployments, and other critical events.
Code Review Collaboration: With the app's capabilities, you can trigger Microsoft Teams notifications to relevant team members or groups when pull requests are created, updated, or merged. This allows for timely code review and collaboration, facilitating faster feedback cycles and ensuring high-quality code before merging into the main branch.
Build and Deployment Monitoring: Integrate the app with your CI/CD systems to send notifications to designated channels when builds are initiated, completed, or encounter issues. These notifications provide visibility into the build and deployment status, allowing team members to stay informed about the progress and promptly address any concerns or failures.
Cross-Team Collaboration: With the app's integration, you can extend coordination beyond individual teams and foster collaboration across different teams working within the Bitbucket repositories. Microsoft Teams notifications can be sent to designated channels, enabling teams to share updates, discuss important changes, and align efforts to achieve project goals.
By leveraging the "Post Webhooks for Bitbucket" app, you can enhance coordination and collaboration throughout the development process. Real-time Microsoft Teams notifications and updates ensure that team members are informed, enabling effective communication, smoother workflows, and timely resolution of issues. This promotes a collaborative environment, improves overall productivity, and helps deliver high-quality software.
How to set up Azure DevOps Pipeline triggering from Bitbucket Server?
How to integrate Bitbucket Server with Jenkins Pipelines?
How to enable notifications from Bitbucket in Microsoft Teams?
Use case: Trigger GitHub workflows
Trigger GitHub workflows from Bitbucket On-Premise
In order to trigger GitHub workflows from Bitbucket On-Premise (Server or Data Center) you need to configure the Post Webhooks for Bitbucket plugin to send the GitHub-specific payload and authenticate the caller.
Create the GitHub personal access token
Ensure that the token has permission to trigger the workflows.
Store it in the token field.
Select payload type as GitHub

Ensure the URL matches the expected GitHub format
The URL should be in the following format https://api.github.com/repos/{REPO_OWNER}/{REPO_NAME_SLUG}/actions/workflows/{WORKFLOW.YML_FILE}/dispatches
Where:
REPO_OWNER is the GitHub org or user that owns the repository where the workflow is stored.
REPO_NAME_SLUG is the GitHub repository slug (the one in the URL).
WORKFLOW.YML_FILE is the name of the file where GitHub workflow is defined. F.e. main-workflow.yml
Workflow example
As you see in the example GitHub workflow, it has defined some inputs and they are used in the steps of a job.
FAQ
What is the relationship between Atlassian and Votazz?
Votazz is an independent Atlassian Marketplace Vendor. We do not have any affiliation with Atlassian.
Will Votazz have access to any information or data when we use Server or Data Center products?
Votazz does not collect any data and we do not know how you use our products or what data is stored, so we rely on your feedback.
Do you support Bitbucket Server/Data Center?
Yes, Post Webhooks for Bitbucket supports Server and Data Center. No Cloud support.
Can I schedule a demo of Post Webhooks for Bitbucket?
Yes, you can schedule the video call here.
Can I trial Post Webhooks for Bitbucket for free before purchasing it?
Votazz provides a fully functional of Post Webhooks for Bitbucket Server for 30 days.
Once the trial period is over, the cost of the app will automatically be included in your next bill unless manually deactivated via the Manage Apps page under the Bitbucket Administration menu. Evaluation licenses can be extended.
You can generate an evaluation license here, or by logging into your my.atlassian.com account and searching for Post Webhooks for Bitbucket by Votazz.
How does the pricing of Post Webhooks for Bitbucket work?
You can find the cost to purchase Post Webhooks for Bitbucket on your Bitbucket Server instance here or your Bitbucket Data Center here. Post Webhooks for Bitbucket for Server or Data Center is sold as a perpetual license, and the purchase price includes 12 months of maintenance (support and version updates).
You can renew maintenance after 12 months at 50% of the current purchase price here.
Does Post Webhooks for Bitbucket support Basic Authentication?
Yes, it does.
Does Post Webhooks for Bitbucket support different HTTP methods?
Yes, it supports POST, GET and PUT.
Does Post Webhooks for Bitbucket support Azure DevOps pipelines?
Yes, it does support Azure DevOps Pipelines in the cloud and deployed on-premises. Here is a short video demo on how Azure DevOps Pipelines integrated with Bitbucket Server.
Does Post Webhooks for Bitbucket support Jenkins?
Yes, it does.
Does Post Webhooks for Bitbucket support custom scripts?
Yes, it supports if they expect Jenkins message format.
Does the app store details I have entered?
Post Webhooks for Bitbucket stores everything in the Bitbucket database.
Could I use the Post Webhooks for Bitbucket without Bitbucket admin rights?
Definitely yes, you can use Post Webhooks for Bitbucket without being the Bitbucket administrator. However, you may need some help from your Bitbucket administrator to configure the application in some circumstances.
Why is the app paid?
We are humans who have families and hobbies, on top of this, we are inspired to provide the best integration between Microsoft Teams and Bitbucket, which requires time and effort to execute well. Notwithstanding these arguments, we strive to provide excellent customer support.
How do I get help?
Please use our Jira Service Portal (called F1) to submit a support request, feature request or just an enquiry. Do not forget to describe your problem in great detail and attach the debug log if possible. We cannot guess about your issues.
How can I extend my trial license?
At this stage, only Bitbucket Server and Bitbucket Data Center customers can extend their evaluation licenses. You can do this by completing this form and updating your product license under the "Manage Add-ons" page in the Admin panel.
Is your application secure?
Yes, and we have enrolled in Bug Crowd Bounty program.
How can I suggest an improvement?
Please contact us to discuss your requirements.
Only a small number of people within my team will be using the app. Am I able to purchase a license for only these people?
When purchasing an app license, the user tier must match that of Atlassian Bitbucket. This is a requirement of the Atlassian Marketplace, as detailed in this Atlassian FAQ. Atlassian handles all licensing for Marketplace vendors so we can focus on what is important to us - providing quality software and supporting our customers. As a result, we are unable to modify the licensing to be restricted to specific user groups within a Bitbucket instance.
I purchased a license for the wrong Votazz app, could you please switch my licenses?
All licensing matters are handled directly through Atlassian, so, unfortunately, there is nothing we can do as vendors to rectify this. Please reach out to sales@atlassian.com and open a ticket directly with Atlassian, they will be able to resolve this for you.
How can I enable the debug mode for Post Webhooks for Bitbucket Server or Data Center?
Follow Debugging and troubleshooting guide.
Release Notes
Release notes for Post Webhooks for Bitbucket.
Your feedback is very welcome, please do not hesitate to reach out at https://votazz.co/contact/
20.0.0+
Notable improvements are:
Bitbucket 9 compatibility
Note: you may need to download the version manually from the Atlassian Marketplace.
7.03.09
Date:
Notable improvements are:
BUG: Big customer: Improved performance of the global page. Added pagination. Now the page does not load all rules on the load.
IMPROVEMENT: Add a flag that permits having multiple global webhook.
IMPROVEMENT: Added ability to override Bitbucket URL in the webhook payload.
IMPROVEMENT: Added settings to control the webhook retry policy.
7.02.04
Date:
Notable improvements are:
IMPROVEMENT: Added support for Pull request approved event.
4.12.16
Date:
Notable improvements are:
IMPROVEMENT: Improved performance and permissions check, which impacted huge instances.
4.12.08
Date: - Bitbucket 7+ support only
Notable improvements are:
DEPRECATED: support of Bitbucket 6.
ADDED: Azure DevOps pipeline parameters configuration.
3.33.27
Date:
Notable improvements are:
ADDED: request timeout has been added to the settings.
4.07.09
Date:
Notable improvements are:
Feature: Added
commitMessageto outgoing APIs.Feature: Improved UI interactions with the APIs.
4.06.22
Date:
Notable improvements are:
Feature: Bitbucket 8+ compatibility.
Feature: Data export and import.
Feature: Documentation improvements.
3.31.09
Date:
Notable improvements are:
Feature: Added
commitMessageto outgoing APIs.Feature: Improved UI interactions with the APIs.
3.30.22
Date:
Notable improvements are:
Feature: Data export and import.
Feature: Documentation improvements.
3.28.28
Date:
Notable improvements are:
Security: Dependency version update.
3.26.07
Date:
Notable improvements are:
Improvement: Now can separately configure from branches to consider, destination branches to consider, destination branches to ignore and destination branches to consider.
3.25.24
Date:
Notable improvements are:
Improvement: Allow editing configurations for Project/Repository readers.
Improvement: New query string parameters added.
3.25.03
Date:
Notable improvements are:
Improvement: Added a new filter for the repository slug on the project and global level. Now you can use a regular expression to filter repository slugs. (Java-style regular expression).
3.24.19
Date:
Notable improvements are:
Improvement: Added a new global setting
Modification permitwhich allows Repository/Project writers to use REST APIs to manage configurations of their repository/project.
3.23.23
Date:
Notable improvements are:
Severe bug fixed for the migration from 2.5.3 to the next versions.
3.23.08
Date:
Notable improvements are:
Added support for additional Azure DevOps pipelines fields. More details are here.
UI improvement: hide unnecessary fields when selecting an authentication method.
3.22.28
Date:
Notable improvements are:
Added support of multiple Azure DevOps build pipeline parameters. See the guide for more information.
Bugfix: an empty event was sent during some PR events.
3.22.12
Date:
Notable improvements are:
Added support for Kerberos authentication.
3.21.20
Date:
Notable improvements are:
There is a global setting to allow/disallow projects to use this App.
There is a global setting to disable old Rest APIs.
3.20.22
Date:
Notable improvements are:
Added support to treat all rules separately. There are 2 system-level settings. Please read here.
Improved the empty state.
3.19.14
Date:
Notable improvements are:
Mask or hide sensitive information in the debug-level logs.
3.19.09
Date:
Notable improvements are:
Added functionality to be able to re-run the migration from an old version (2.4 or below). More details are in this guide.
Security & Privacy
Here you can find additional information related to security and privacy of Post Webhooks for Bitbucket.
End User License Agreement
https://votazz.co/privacy-policy-terms-of-use/#terms
Privacy Policy
https://votazz.co/privacy-policy-terms-of-use/
Security practices
https://votazz.co/privacy-policy/
Security Bug Bounty
Post Webhooks for Bitbucket is enrolled on the Bug Bounty program. More information can be found here https://www.atlassian.com/licensing/marketplace#general-faqs
Security Self Assessment Questionaire
Post Webhooks for Bitbucket is part of the Votazz Atlassian Marketplace Partner app portfolio. Votazz provides all required answers to Atlassian annually.
More details can be found here https://developer.atlassian.com/platform/marketplace/security-self-assessment-program/
Help & Support
Contact information
Please create a support request here.